This tutorial covers setting up the Data Collection Application Function (DCAF) with Docker and using its REST API with the Insomnia REST client.
What you will build: a running DCAF, driven end to end through its provisioning (R1), event subscription (R6) and direct data reporting (R2) interfaces from the Insomnia REST client.
Prerequisites
- Docker installed on your machine (download from here).
- The Insomnia REST client (download from here).
- Basic familiarity with running containers and issuing REST API requests.
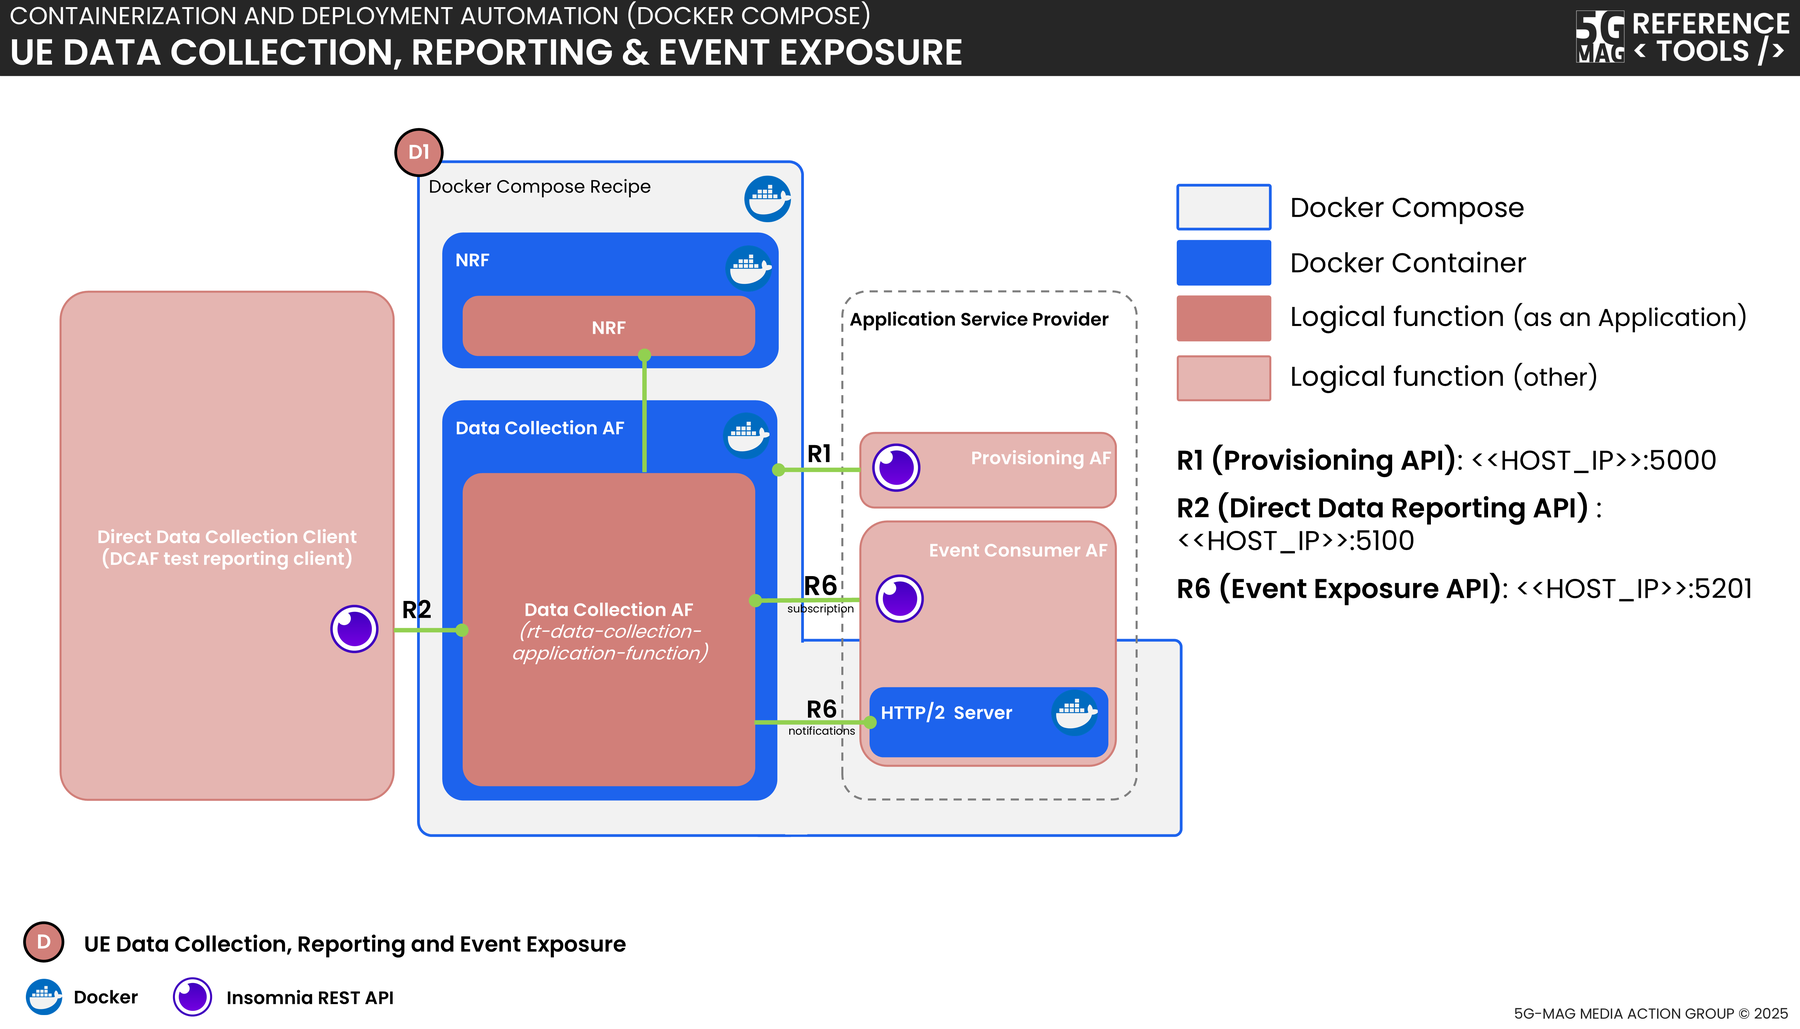
Setup diagram
Requirements
Same two tools as in Prerequisites above; see there for download links.
DCAF Setup
Downloading
rt-data-collection-application-functionData Collection Application Function source, cloned with submodules for the Docker build.First, clone the repository of the Data Collection Application Function. Open a terminal and run:
git clone --recurse-submodules https://github.com/5G-MAG/rt-data-collection-application-function.git
Starting the Docker Containers
Now that the source code of the Data Collection Application Function is available, build the Docker images and start the Docker containers. Navigate to the root directory of the repository and build the Docker containers:
cd rt-data-collection-application-function/docker/local
docker compose up
This will start three Docker containers:
nrf: A 5G Core Network Repository Function (NRF) for the Application Function to register with.dcaf: The Data Collection Application Function that exposes multiple REST APIs to interact with. These APIs are used later with the Insomnia REST client.h2-server: A fully-functional HTTP/2 server to handle data that is provided by the DCAF as a response to event. subscriptions.
Building the Docker containers may take a while. Once the containers are up and running, the REST APIs
exposed by the Data Collection Application Function become accessible. For that reason, the ports of the dcaf container are mapped to
the corresponding ports on the host machine:
dcaf:
  ports:
    - '5000:5000' # Provisioning API (R1)
    - '5100:5100' # Direct Data Reporting API (R2)
    - '5201:5201' # Event Consumer Application Function Event Exposure API (R6)
If you run into any issues with ports already being in use, you can change the port mappings in the
docker-compose.yml. Note that you also need to change the corresponding Insomnia environment variables then (see
Insomnia Setup below).
Once the Docker containers are running you should see an output like this:
 ✔ Network reftools_5g-mag_data-collection-af-local_default        Created                                                                                                                            0.0s
 ✔ Container reftools_5g-mag_data-collection-af-local-nrf-1        Created                                                                                                                            0.0s
 ✔ Container reftools_5g-mag_data-collection-af-local-h2-server-1  Created                                                                                                                            0.0s
 ✔ Container reftools_5g-mag_data-collection-af-local-dcaf-1       Created                                                                                                                            0.0s
Attaching to dcaf-1, h2-server-1, nrf-1
nrf-1        | Open5GS daemon v2.7.2
nrf-1        |
nrf-1        | 03/25 13:09:37.843: [app] INFO: Configuration: '/etc/open5gs/default/nrf.yaml' (../lib/app/ogs-init.c:133)
nrf-1        | 03/25 13:09:37.843: [app] INFO: File Logging: '/open5gs/install/var/log/open5gs/nrf.log' (../lib/app/ogs-init.c:136)
nrf-1        | 03/25 13:09:37.845: [sbi] INFO: nghttp2_server() [http://0.0.0.0]:7777 (../lib/sbi/nghttp2-server.c:424)
nrf-1        | 03/25 13:09:37.845: [app] INFO: NRF initialize...done (../src/nrf/app.c:31)
dcaf-1       | Open5GS daemon v2.6.4-10-gb9dd812
dcaf-1       |
dcaf-1       | 03/25 13:09:37.972: [app] INFO: Configuration: '/etc/open5gs/dcaf.yaml' (../subprojects/open5gs/lib/app/ogs-init.c:126)
dcaf-1       | 03/25 13:09:37.972: [app] INFO: File Logging: '/home/ubuntu/af/open5gs/build/log/data-collection.log' (../subprojects/open5gs/lib/app/ogs-init.c:129)
dcaf-1       | 03/25 13:09:37.974: [app] INFO: LOG-LEVEL: 'info' (../subprojects/open5gs/lib/app/ogs-init.c:132)
dcaf-1       | 03/25 13:09:37.977: [DCAF] INFO: Initialising library:
dcaf-1       |   Library Version: [libspdc-1.0.0]
dcaf-1       |   Version [1.0.0]
dcaf-1       |   Major: [0],
dcaf-1       |   Minor [1]
dcaf-1       |   Micro: [0]
dcaf-1       |  (../src/data-collection-af/init.c:105)
dcaf-1       | 03/25 13:09:37.979: [data-collection-service-producer] INFO: Registering Data Collection Service [3gpp-ndcaf_data-reporting-provisioning] (../lib/data-collection-service-provider/data-collection-nf-service.c:67)
dcaf-1       | 03/25 13:09:37.980: [data-collection-service-producer] INFO: Registering Data Collection Service [3gpp-ndcaf_data-reporting] (../lib/data-collection-service-provider/data-collection-nf-service.c:67)
dcaf-1       | 03/25 13:09:37.980: [data-collection-service-producer] INFO: Registering Data Collection Service [naf-eventexposure] (../lib/data-collection-service-provider/data-collection-nf-service.c:67)
dcaf-1       | 03/25 13:09:37.981: [sbi] INFO: nghttp2_server() [http://127.0.0.1]:7777 (../subprojects/open5gs/lib/sbi/nghttp2-server.c:395)
dcaf-1       | 03/25 13:09:37.982: [sbi] INFO: nghttp2_server() [http://0.0.0.0]:5000 (../subprojects/open5gs/lib/sbi/nghttp2-server.c:395)
dcaf-1       | 03/25 13:09:37.982: [sbi] INFO: nghttp2_server() [http://0.0.0.0]:5102 (../subprojects/open5gs/lib/sbi/nghttp2-server.c:395)
dcaf-1       | 03/25 13:09:37.982: [sbi] INFO: nghttp2_server() [http://0.0.0.0]:5100 (../subprojects/open5gs/lib/sbi/nghttp2-server.c:395)
nrf-1        | 03/25 13:09:37.986: [sbi] INFO: NF EndPoint(fqdn) setup [dcaf:0] (../lib/sbi/context.c:2195)
dcaf-1       | 03/25 13:09:37.983: [sbi] INFO: nghttp2_server() [http://0.0.0.0]:5101 (../subprojects/open5gs/lib/sbi/nghttp2-server.c:395)
nrf-1        | 03/25 13:09:37.986: [sbi] INFO: NF EndPoint(addr) setup [127.0.0.1:80] (../lib/sbi/context.c:2195)
dcaf-1       | 03/25 13:09:37.983: [sbi] INFO: nghttp2_server() [http://0.0.0.0]:5201 (../subprojects/open5gs/lib/sbi/nghttp2-server.c:395)
nrf-1        | 03/25 13:09:37.986: [sbi] INFO: NF EndPoint(addr) setup [0.0.0.0:5000] (../lib/sbi/context.c:1934)
dcaf-1       | 03/25 13:09:37.984: [sbi] INFO: nghttp2_server() [http://0.0.0.0]:5200 (../subprojects/open5gs/lib/sbi/nghttp2-server.c:395)
nrf-1        | 03/25 13:09:37.986: [sbi] INFO: NF EndPoint(addr) setup [0.0.0.0:5100] (../lib/sbi/context.c:1934)
dcaf-1       | 03/25 13:09:37.985: [app] INFO: 5G Data Collection AF initialize...done (../src/data-collection-af/app.c:23)
nrf-1        | 03/25 13:09:37.987: [sbi] INFO: NF EndPoint(addr) setup [0.0.0.0:5201] (../lib/sbi/context.c:1934)
dcaf-1       | 03/25 13:09:37.985: [DCAF] INFO: [67bfc656-097a-41f0-9047-3b8b76ef7fa1] DCAF Running (../src/data-collection-af/dcaf-sm.c:61)
nrf-1        | 03/25 13:09:37.987: [nrf] INFO: [67bfc656-097a-41f0-9047-3b8b76ef7fa1] NF registered [Heartbeat:10s] (../src/nrf/nf-sm.c:202)
dcaf-1       | 03/25 13:09:37.987: [sbi] INFO: [67bfc656-097a-41f0-9047-3b8b76ef7fa1] NF registered [Heartbeat:10s] (../subprojects/open5gs/lib/sbi/nf-sm.c:214)
The log above shows a successful start-up. Look for DCAF Running, which confirms the Data Collection AF is up, and the two NF registered lines, which confirm the DCAF has registered with the NRF.
Insomnia Setup
Now that the Docker containers are up and running, set up the Insomnia REST client.
The imported Insomnia collection ships with After-Response scripts that automatically capture identifiers (such as the provisioning session id, data reporting configuration id, event subscription id and data reporting session id) from each response and store them in environment variables. Because of this, later requests can reuse those values without you copying them by hand. The scripts shown in the steps below are the same mechanism applied at each stage.
Pre-Configuration
The DCAF requires the HTTP version to be set to HTTP/2 PriorKnowledge for incoming requests. To set this up in
Insomnia, navigate to Settings and change Preferred HTTP version to HTTP/2 PriorKnowledge.
Importing the Workspace
For your convenience, an Insomnia workspace is provided for import. Download the workspace from here.
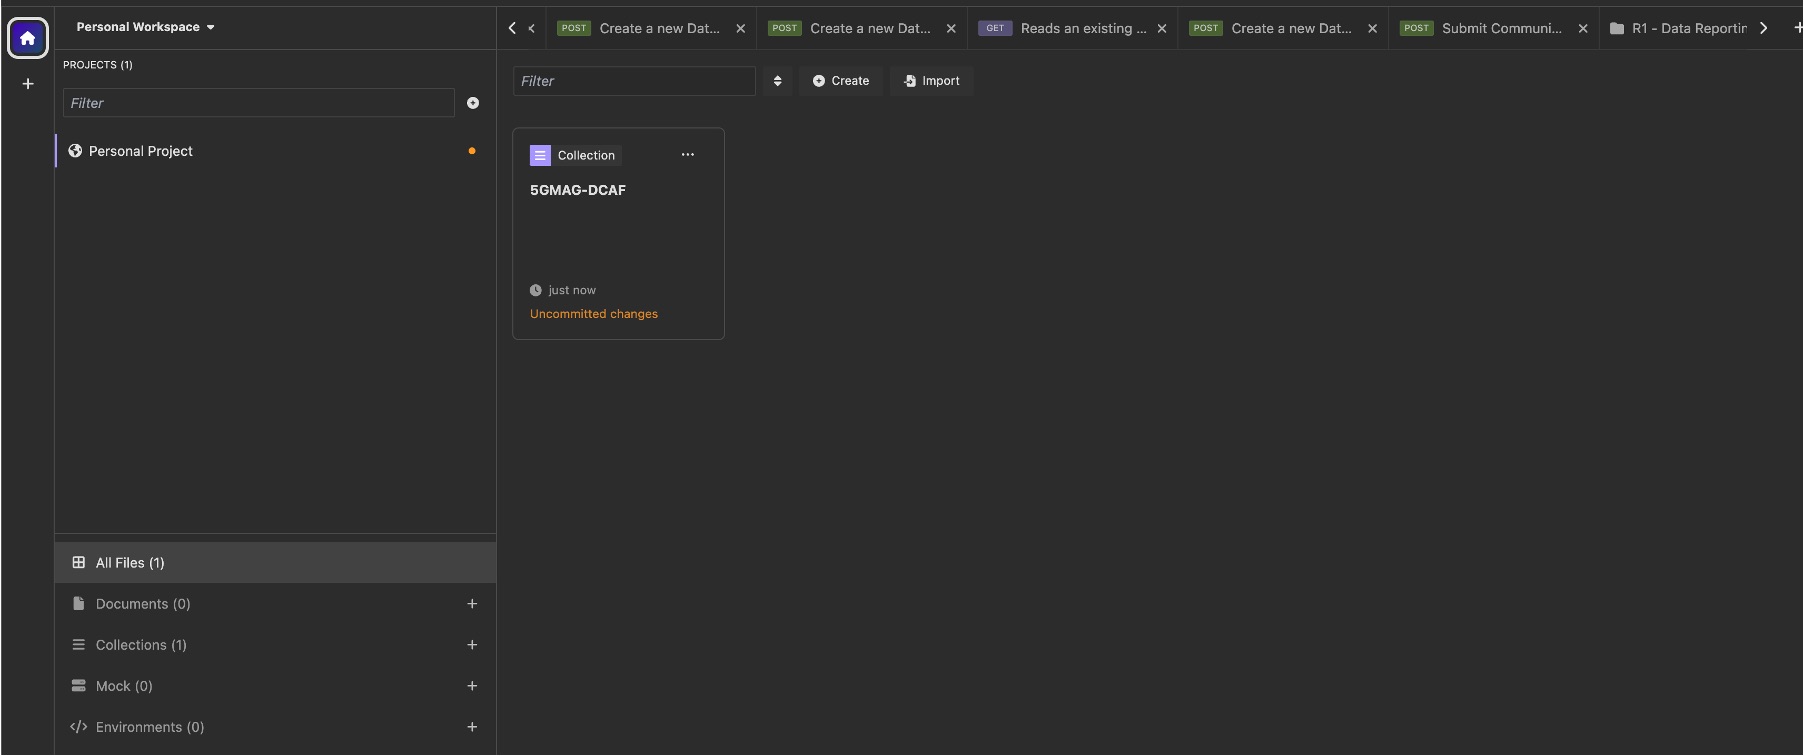
Once you downloaded the file click on import in the Insomnia REST client and select the downloaded file. This will
import the required HTTP requests and the environment variables. You should then see the 5GMAG-DCAF collection in the
center of the Insomnia window:
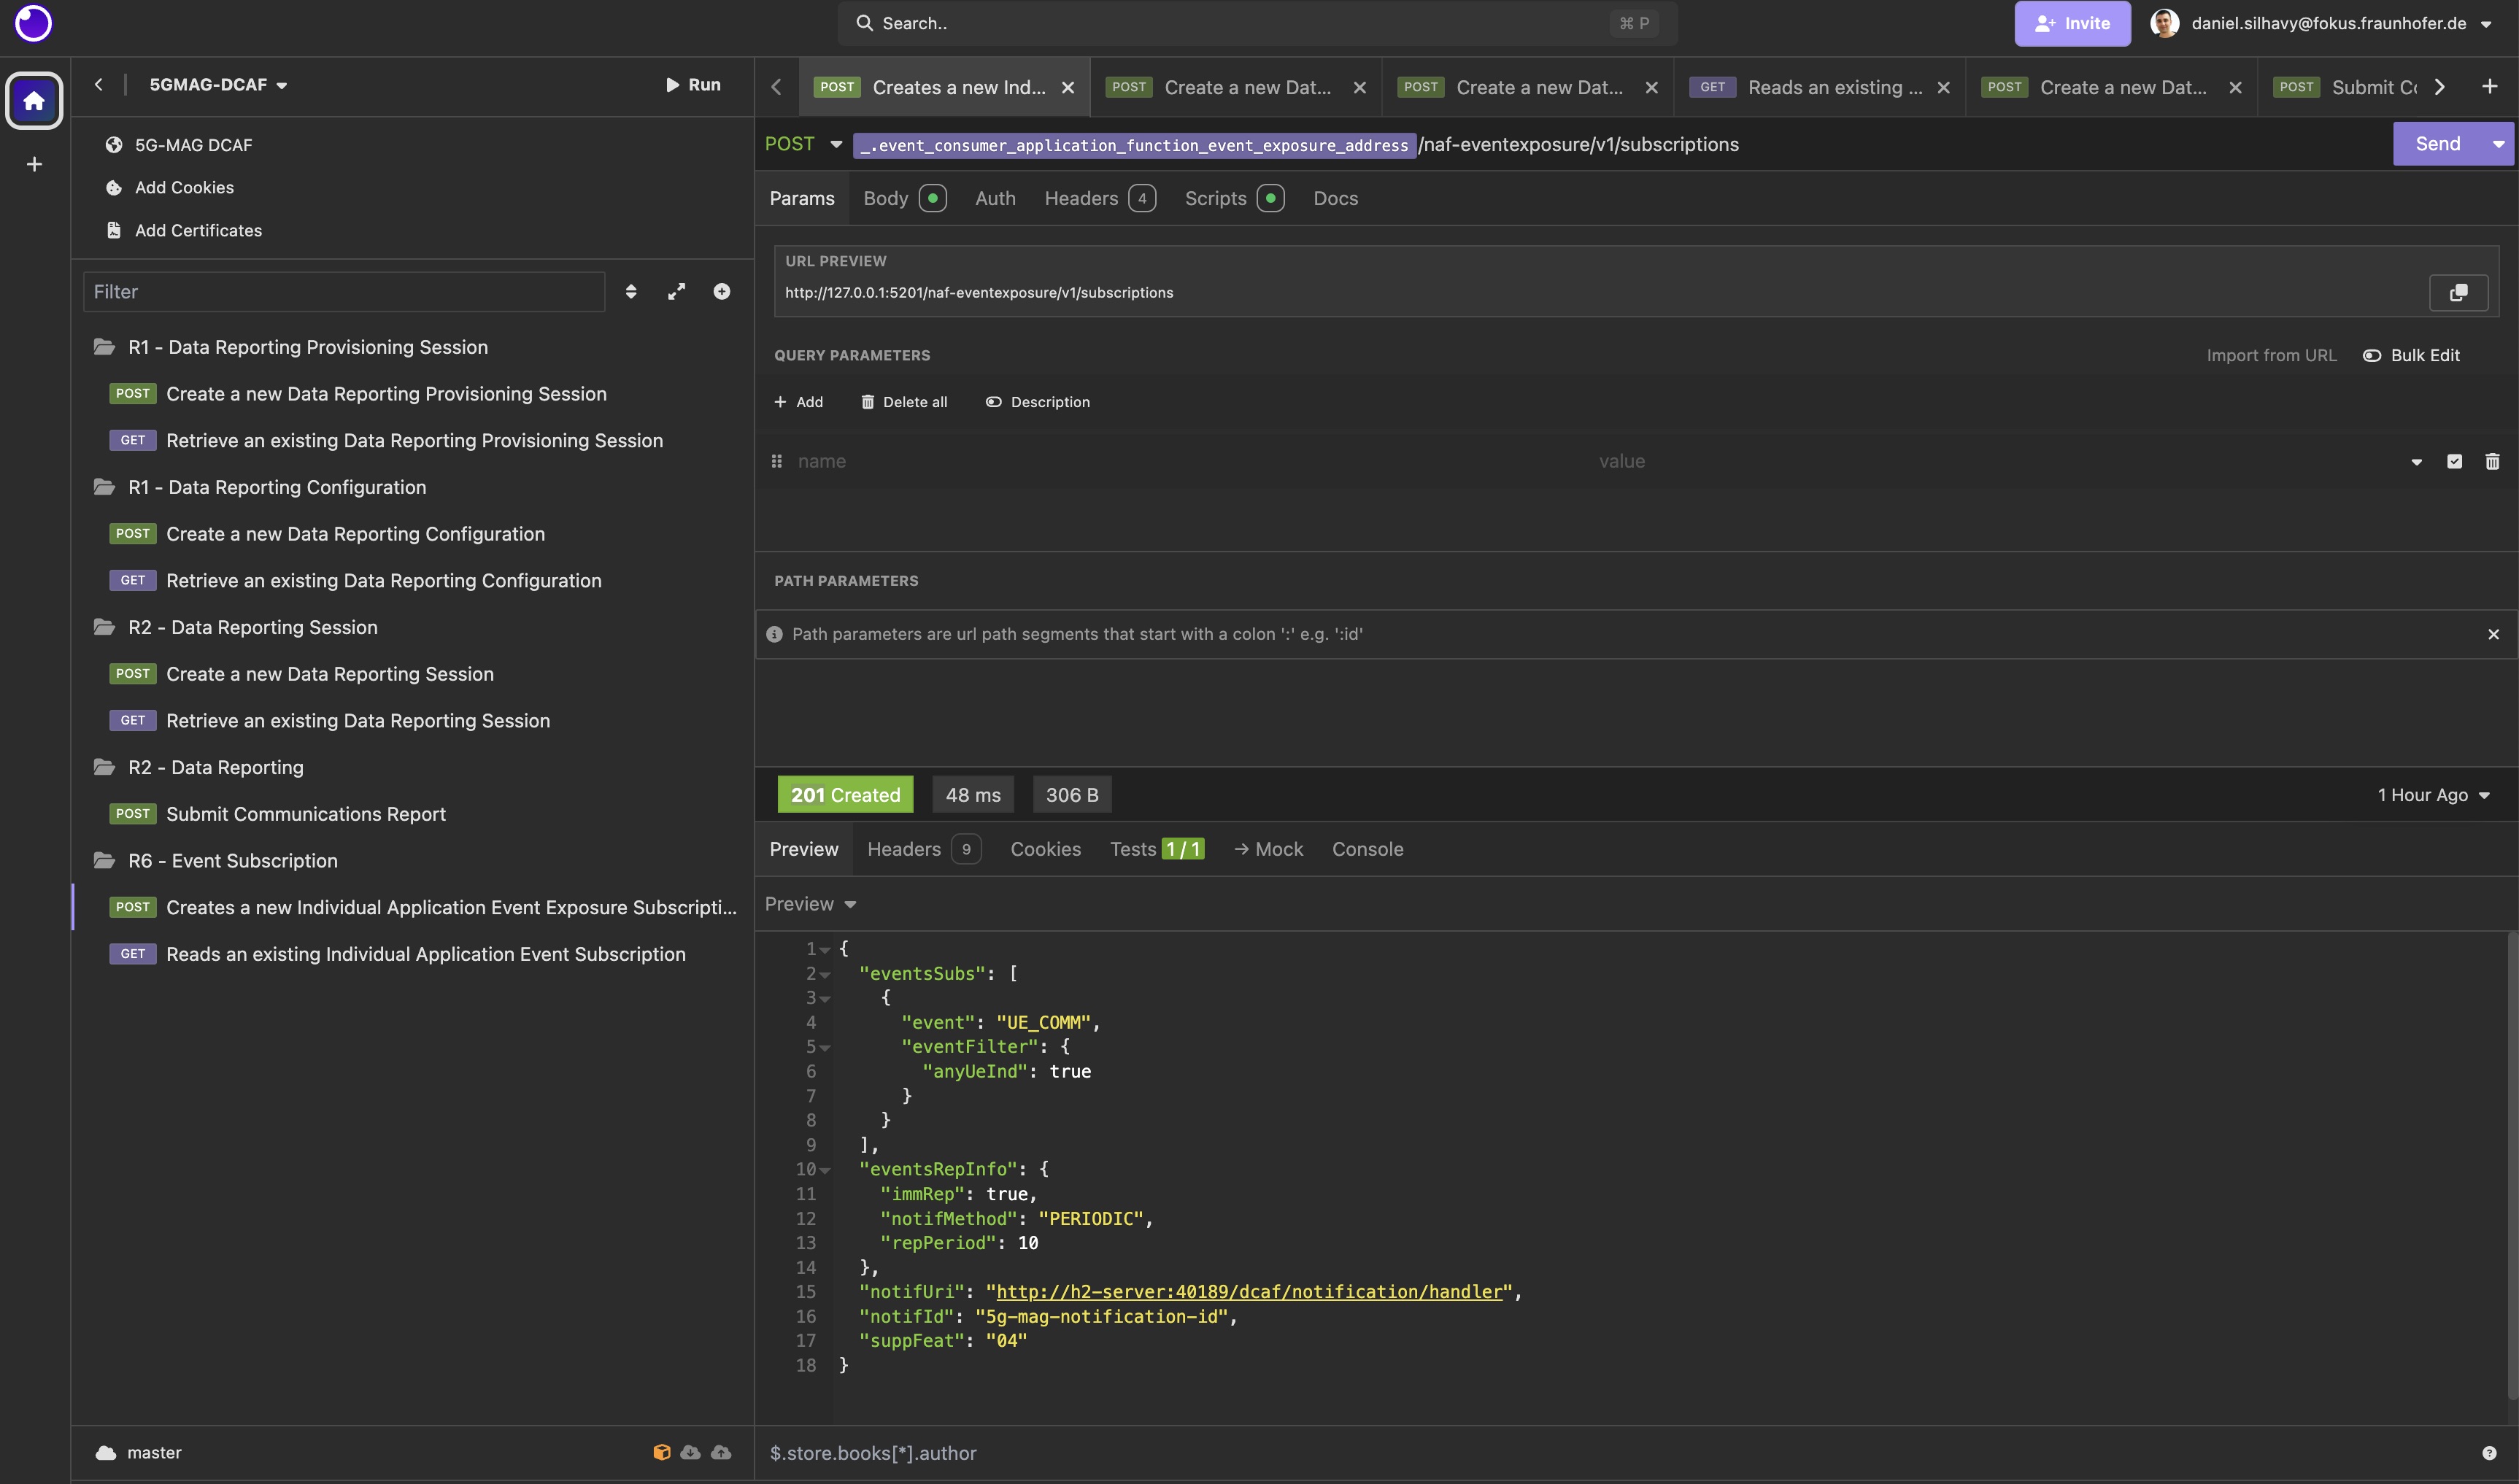
Now select the 5GMAG-DCAF collection and you will see the available HTTP requests on the left side of Insomnia.
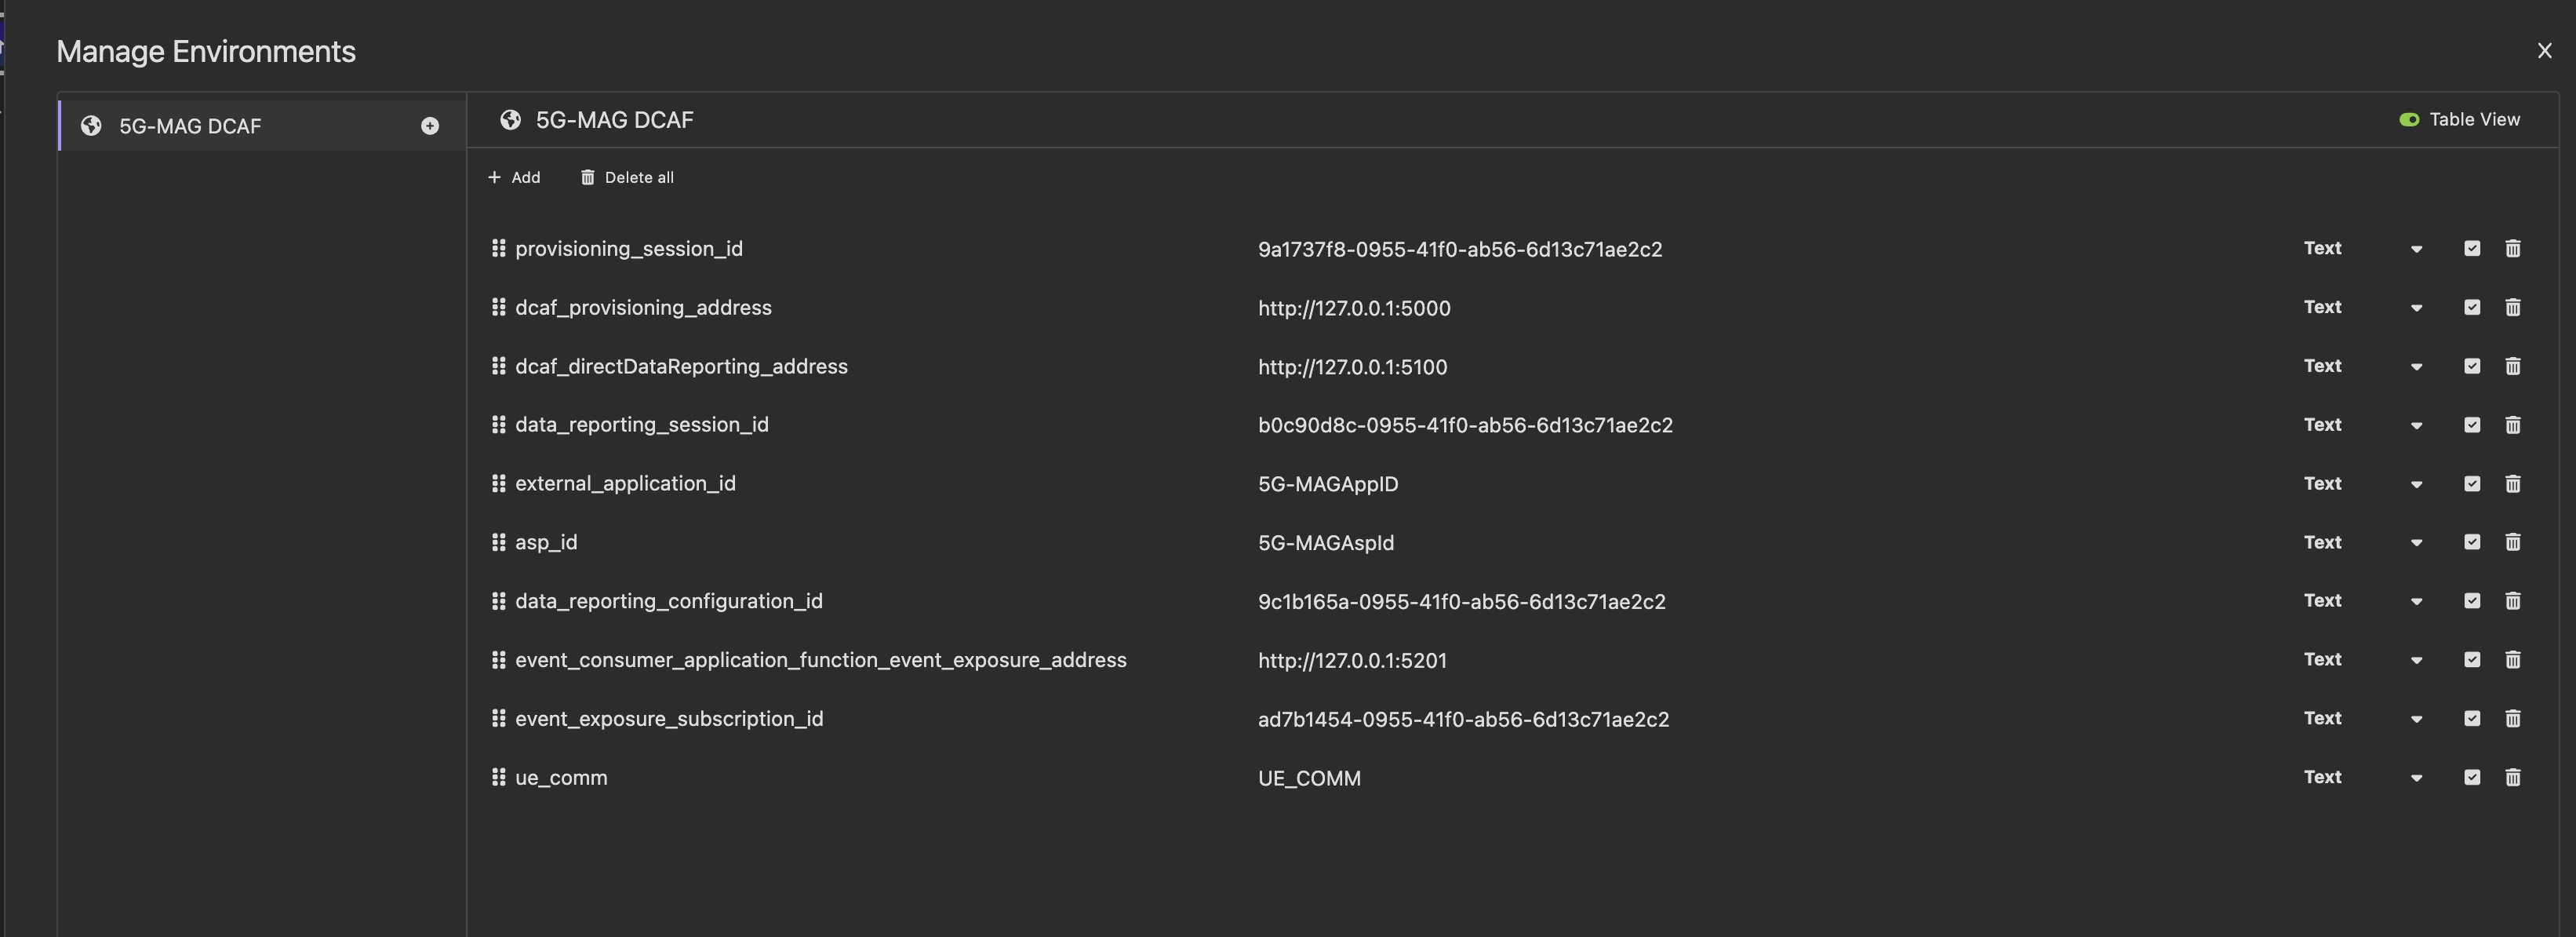
If you need to change the environment variables, you can do so by clicking on 5G-MAG DCAF in the top left corner next
to the globe symbol and select the edit icon next to Collection Environments. Then you can edit the environment
variables.
Note that the Insomnia collection ships with multiple After-Responses scripts that set the environment
variables based on the payload or the headers of the HTTP response. As an example, the provisioningSessionId is
automatically set after creating a new Data Reporting Provisioning Session:
const response = insomnia.response.json();
const provisioningSessionId = response.provisioningSessionId;
insomnia.environment.set('provisioning_session_id', provisioningSessionId);
Using the REST APIs
Now that all components are running and the Insomnia workspace is set up, the REST APIs of the DCAF can be used. This tutorial follows the steps shown in the usage sequence below:
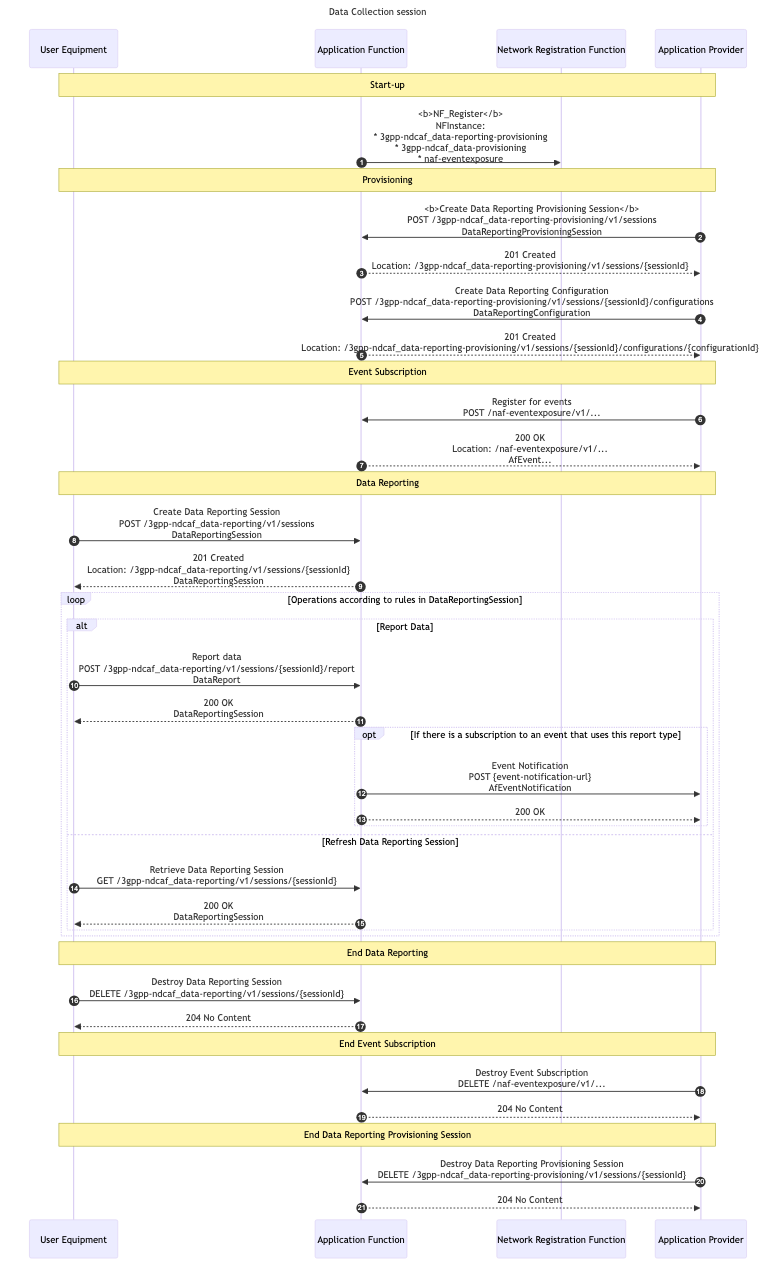
Figure: usage sequence for this tutorial, from start-up through provisioning, event subscription and data reporting.
Start-Up phase
At start-up, the DCAF registers with the NRF and starts the HTTP/2 server. This is done automatically and does not require any user interaction.
In the logs you will find the following lines:
nrf-1        | 03/25 13:09:37.987: [nrf] INFO: [67bfc656-097a-41f0-9047-3b8b76ef7fa1] NF registered [Heartbeat:10s] (../src/nrf/nf-sm.c:202)
dcaf-1       | 03/25 13:09:37.987: [sbi] INFO: [67bfc656-097a-41f0-9047-3b8b76ef7fa1] NF registered [Heartbeat:10s] (../subprojects/open5gs/lib/sbi/nf-sm.c:214)
Provisioning Phase
In the provisioning phase, act as an Application Provider and create a new Data Reporting Provisioning Session and a
Data Reporting Configuration. This is done by sending POST requests via Insomnia to the DCAF.
Creating a new Data Reporting Provisioning Session
To create a new Data Reporting Provisioning Session navigate to the R1 - Data Reporting Provisioning Session folder in
the Insomnia workspace and select the
Create a new Data Reporting Provisioning Session.
Adjust the body of the request with the parameters you like to use or use the predefined ones. Then Send the request.
The DCAF returns the location of the created resource in the location header of the HTTP response. An After-Response
script will automatically save the provisioning session id in the corresponding environment variable:
const response = insomnia.response.json();
const provisioningSessionId = response.provisioningSessionId;
insomnia.environment.set('provisioning_session_id', provisioningSessionId);
Creating a new Data Reporting Configuration
Next, create a new Data Reporting Configuration. Navigate to the R1 - Data Reporting Configuration folder in the
Insomnia workspace and select the Create a new Data Reporting Configuration POST request. Send the request after
adjusting the body as desired.
Again, an After-Response script will automatically save the data reporting configuration id in the corresponding
environment variable:
const response = insomnia.response.json();
const dataReportingConfigurationId = response.dataReportingConfigurationId;
insomnia.environment.set('data_reporting_configuration_id', dataReportingConfigurationId);
Event Subscription Phase
In the event subscription phase, register for events of interest. This is done by sending POST
requests as an Application Provider to the DCAF.
For that reason, navigate to the R6 - Event Subscription folder in the Insomnia workspace and select the
Creates a new Individual Application Event Exposure Subscription resource option.
Send the request after adjusting the remaining fields of the body as desired.
Again, an After-Response script will handle the response and save the event subscription id in the corresponding
environment variable if the response code is set to 200:
const locationHeader = insomnia.response.headers.find((header) => header.key === 'location');

insomnia.test('Check if status is 200', () => {
  insomnia.expect(locationHeader).to.not.be.empty;
});

if (locationHeader) {
  const uuid = locationHeader.value.split('/').pop();
  if (uuid) {
    insomnia.environment.set('event_exposure_subscription_id', uuid);
  }
}
Optional: Changing the HTTP/2 server port
By default, the HTTP/2 server that is receiving the reports is started on port 8888. If you want to change the port
open h2_svr-docker.py and edit the following line:
server = await loop.create_server(H2Protocol, '0.0.0.0', 8888)
Replace 8888 with the port you want to use. For instance
server = await loop.create_server(H2Protocol, '0.0.0.0', 4444)
As the port of the server that is receiving the event notifications is preconfigured, adjust the notifUri in the
request body. Copy the port number (in this example the port is set to 4444) and replace the existing port in the
notifUri field of the request body. For instance:
"notifUri": "http://h2-server:4444/dcaf/notification/handler",
Data Reporting Phase
In the data reporting phase, take the role of the user equipment (UE) and create a data reporting session and then send data reports.
Creating a new Data Reporting Session
To create a new data reporting session navigate to the R2 - Data Reporting Session folder in the Insomnia workspace
and select Create a new Data Reporting Session. Send the request after adjusting the body parameters as desired.
Again, an After-Response script will handle the response and save the data reporting session id in the corresponding
environment variable:
const response = insomnia.response.json();
const dataReportingSessionId = response.sessionId;
insomnia.environment.set('data_reporting_session_id', dataReportingSessionId);
Submitting a communications report
The final step is to submit a communications report. For that reason, navigate to the R2 - Data Reporting folder and
select Submit Communications Report. Adjust the body parameters as desired and send the request.
Checking the reports
If everything went well, you should see the reports in the log file located in
rt-data-collection-application-function/docker/local/logs/notifications. The example below shows one such notification: the headers of the POST delivered to the HTTP/2 server, followed by the reported UE communication information (upload and download volumes for a time window):
{
  "headers": {
    ":method": "POST",
    ":scheme": "http",
    ":authority": "h2-server:34117",
    ":path": "/dcaf/notification/handler",
    "accept": "*/*",
    "content-type": "application/json",
    "content-length": "340"
  },
  "body": {
    "notifId": "5g-mag-notification-id",
    "eventNotifs": [
      {
        "event": "UE_COMM",
        "timeStamp": "2025-03-25T13:00:44Z",
        "ueCommInfos": [
          {
            "appId": "5G-MAGAppID",
            "comms": [
              {
                "startTime": "2025-02-05T14:28:00Z",
                "endTime": "2025-02-05T14:29:00Z",
                "ulVol": 1000,
                "dlVol": 2000
              }
            ]
          }
        ]
      }
    ]
  }
}
End Data Reporting Provisioning Session
This tutorial does not destroy the sessions, so steps 18 - 21 from the above diagram are not executed.
Wrapping up
To stop and remove the containers when you are done, run the following from rt-data-collection-application-function/docker/local:
docker compose down
Next steps
- Read the Scope page for how these interfaces fit the wider framework.
- Browse the project index for repositories, packages and releases.