This tutorial allows to: Deploy 5G Media Streaming.
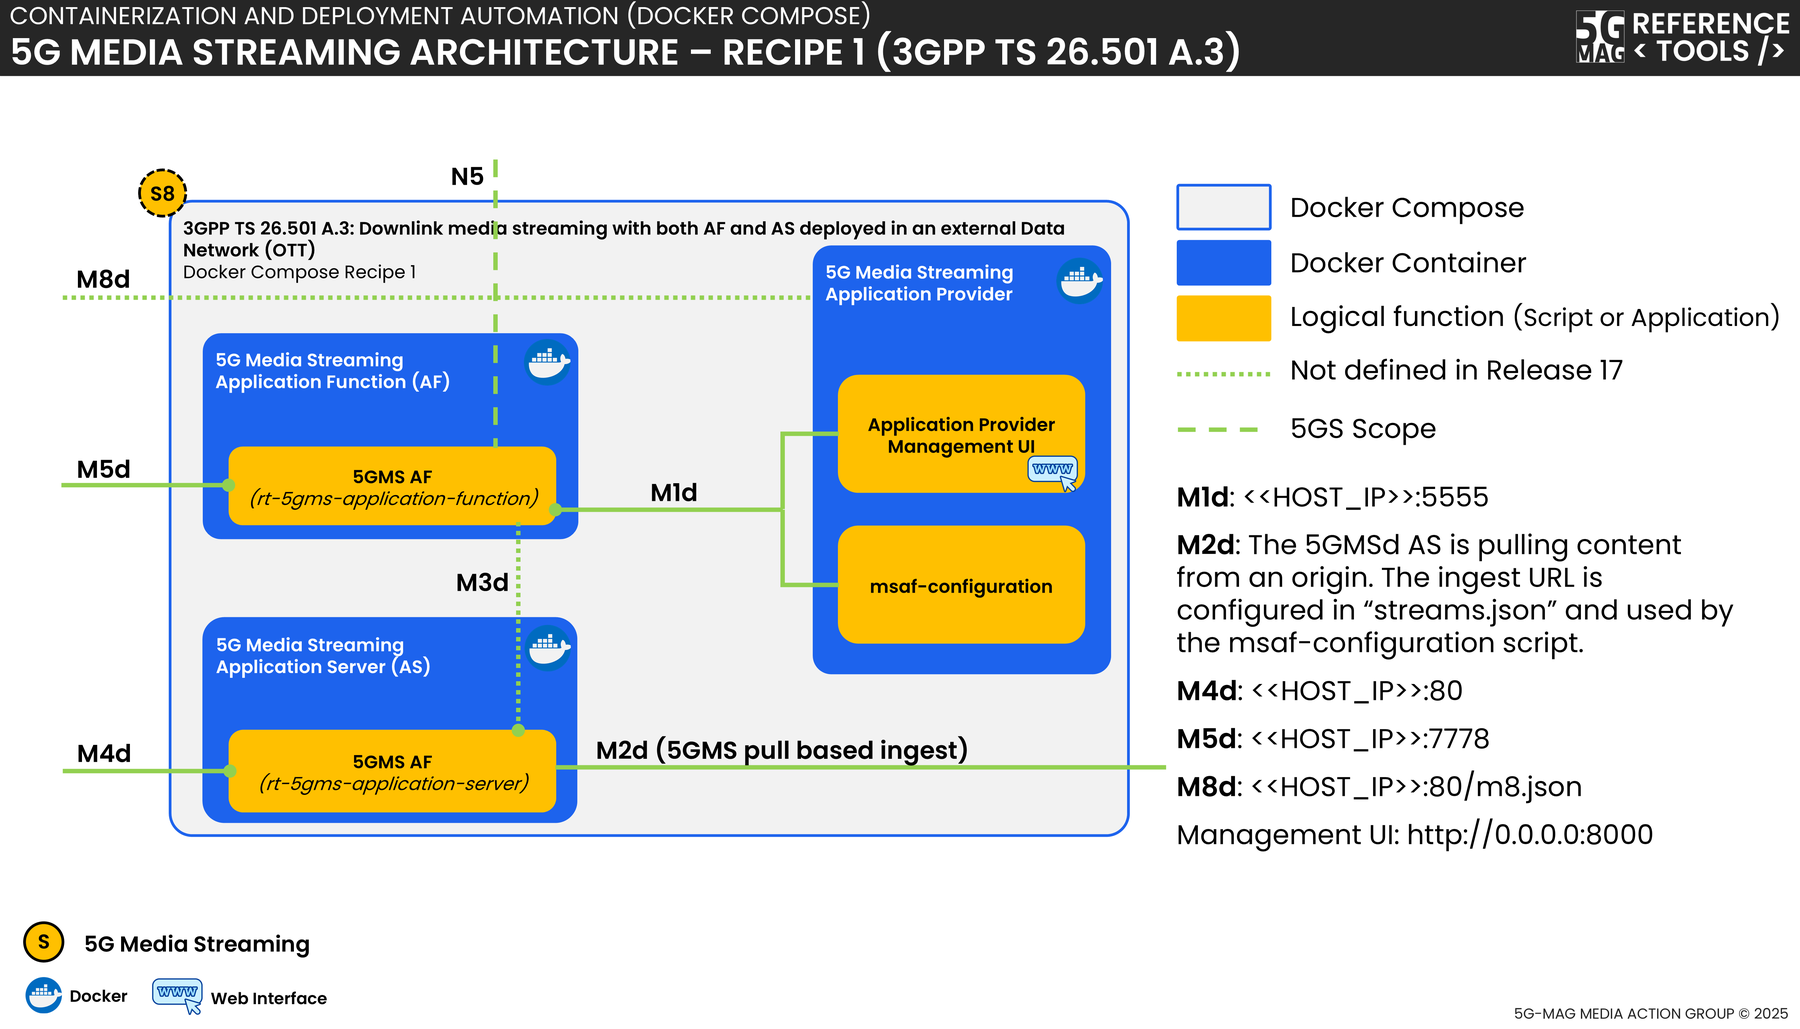
This guide describes how to setup and configure the Reference Tools - 5G Downlink Media Streaming components to create an end to end setup as depicted in the illustration below.
What you will build: an end-to-end 5GMSd deployment where an Android phone plays an adaptive bitrate stream delivered from a local Application Function (AF) and Application Server (AS). The guide is in two halves: a server-side setup (installing and configuring the AF and AS) and a client-side setup (installing and configuring the Android components).
Figure: end-to-end 5GMSd setup, showing the server-side AF and AS and the client-side Android components.

Components
This end-to-end deployment is built from six repositories, each with a distinct role:
Prerequisites
Server-side setup
There are multiple ways to do the server-side setup, split into three alternative paths — pick the one that fits what you're doing:
Option 1: Docker Compose setup
The required files for the Docker Compose setup are located in the rt-5gms-examples project.
The 5gms-docker-setup provides multiple Docker Compose setups to run the 5GMS Application Function, the 5GMS
Application Server and the
5GMS Application Provider in Docker container environments. This tutorial, assumes you are using Docker Compose recipe.
Setup
First, clone the rt-5gms-examples repository:
git clone https://github.com/5G-MAG/rt-5gms-examples.git
Now switch to the 5gms-docker-setup/recipe1 folder:
cd rt-5gms-examples/5gms-docker-setup/recipe1
Follow the required configuration and the installation instructions in the Readme file.
Once completed, verify that the m8.json has been created and can be accessed. Open the following URLs in your browser
and verify that a valid JSON file is returned:
http://localhost/m8.jsonhttp://<<ENTER_YOUR_IP_HERE>>/m8.json
After that you can directly jump to the client-side setup.
Option 2: Common server-side setup
1. Installing the Application Function
The first component to install is the 5GMSd Application Function (AF). The AF is a network function that forms part of the 5G Media Streaming framework as defined in TS 26.501. AF is a logical function which embodies control plane aspects such as provisioning, configuration, and reporting, among others. Such functions can be provisioned by the 5GMSd Application Provider using a RESTful HTTP-based API (M1d). Another RESTful HTTP-based configuration and reporting API (M5d) is exposed to 5GMSd Clients.
The detailed installation guide for the AF is in its repository:
rt-5gms-application-functionFull installation guide and configuration reference.2. Installing the Application Server
Next, install the 5GMSd Application Server (AS). The AS provides 5G Media Streaming services to a
population of 5GMSd Clients. This logical function embodies the data plane aspects that deal with media content (for
instance, a Content Delivery Network). The content is ingested (both HTTP push- or pull-based are supported) from 5GMSd
Application Providers at reference point M2d. The content is distributed to 5GMSd Clients at reference point M4d,
which supports standard pull-based content retrieval protocols (e.g. DASH).
The detailed installation guide for the AS is in its repository:
rt-5gms-application-serverFull installation guide and configuration reference.3. Running the Application Server
Now start the AS
sudo 5gms-application-server
For additional options, refer to
the documentation. Pay attention to
the port configuration of the AS, as it requires root permission to run on the standard ports (80 & 443).
4. Running the Application Function
Now that the AF and the AS are installed, configure the AF. A detailed configuration guide is available in the documentation of the AF.
5. Configuration of the AF
This step applies only the minimal configuration change needed for this demo; the full set of configuration options is documented in the AF configuration guide.
For this demo, AF and AS run on the same machine. To access the ServiceAccessInformation via the
M5d interface from the Media Session Handler running on an Android device, the configuration needs a slight
modification. The goal is to expose the M5d interface via the IP address of the machine but have it running on a
different port to not interfere with the default port of the M3interface on the AS (Port 7777).
- Open
/usr/local/etc/open5gs/msaf.yaml - Find the settings for
msaf:m5 - Replace the
addrfield with0.0.0.0and choose a differentport. For instance:
msaf:
  m5:
    - addr: 0.0.0.0
    - port: 7778
6. Starting the AF
Since the AF was installed as a local user, start it with the following command:
/usr/local/bin/open5gs-msafd
7. Creating a Content Hosting Configuration
There is a guide on how to test the AS with the AF in
the documentation. This tutorial follows
a slightly different approach, using the msaf-configuration tool that ships with version 1.3.0 of the Application
Function. The msaf-configuration tool creates a provisioningSession and a contentHostingConfiguration based on a
JSON input file. Moreover, it automatically generates the required M8 information that will be needed later on
the client-side.
First, create a configuration file to be used by the msaf-configuration tool:
[ af-sync ]
    m5_authority = <YOUR_MACHINE_IP_HERE>:<M5_PORT_HERE>
  #docroot = /var/cache/rt-5gms/as/docroots
#default_docroot = /usr/share/nginx/html
Replace <YOUR_MACHINE_IP_HERE> with the IP address of your machine and <M5_PORT_HERE> with the port that the M5
interface is running on. For instance:
[ af-sync ]
    m5_authority = 192.168.178.55:7778
  #docroot = /var/cache/rt-5gms/as/docroots
#default_docroot = /usr/share/nginx/html
Place this file in /etc/rt-5gms/af-sync.conf
Now define a JSON file with the streams:
{
  "aspId": "5GMAG",
  "appId": "5G-MAG_Reference_Tools",
  "streams": {
    "vod": {
      "name": "BBC R&D Demo Streams",
      "ingestURL": "https://rdmedia.bbc.co.uk/",
      "distributionConfigurations": [
        {
          "domainNameAlias": "<YOUR_MACHINE_IP_HERE>"
        }
      ]
    }
  },
  "vodMedia": [
    {
      "name": "VoD: Elephant's Dream",
      "stream": "vod",
      "entryPoints": [
        {
          "relativePath": "elephants_dream/1/client_manifest-all.mpd",
          "contentType": "application/dash+xml",
          "profiles": ["urn:mpeg:dash:profile:isoff-live:2011"]
        }
      ]
    },
    {
      "name": "VoD: Big Buck Bunny",
      "stream": "vod",
      "entryPoints": [
        {
          "relativePath": "bbb/2/client_manifest-common_init.mpd",
          "contentType": "application/dash+xml",
          "profiles": ["urn:mpeg:dash:profile:isoff-live:2011"]
        }
      ]
    },
    {
      "name": "VoD: Testcard",
      "stream": "vod",
      "entryPoints": [
        {
          "relativePath": "testcard/vod/manifests/avc-full.mpd",
          "contentType": "application/dash+xml",
          "profiles": ["urn:mpeg:dash:profile:isoff-live:2011"]
        },
        {
          "relativePath": "testcard/vod/manifests/avc-full.m3u8",
          "contentType": "application/x-mpegURL"
        }
      ]
    }
  ]
}
Again, replace <YOUR_MACHINE_IP_HERE> with the IP address of your machine.
Place this file in /etc/rt-5gms/streams.json
Now install and execute the
msaf-configuration tool:
sudo /usr/local/bin/msaf-configuration
You should see a message like this:
INFO:__main__:Publishing M8 info to: /usr/share/nginx/html, /var/cache/rt-5gms/as/docroots/192.168.178.55
You can check the response of the m8 request by opening http://localhost/m8.json in your browser. It should look
like this. The stream names and identifiers shown (for example "VoD: Llama Drama") are illustrative; your output reflects the streams you defined in your own streams.json.
{
  "m5BaseUrl": "http://192.168.178.55:7778/3gpp-m5/v2/",
  "serviceList": [
    {
      "provisioningSessionId": "872a0eb2-e40a-41ed-bf2a-03b8343221a7",
      "name": "VoD: Llama Drama",
      "entryPoints": [
        {
          "locator": "http://192.168.178.55/m4d/provisioning-session-872a0eb2-e40a-41ed-bf2a-03b8343221a7/634cd01c-6822-4630-8444-8dd6279f94c6/CaminandesLlamaDrama4K.ism/manifest(format=mpd-time-csf)",
          "contentType": "application/dash+xml",
          "profiles": ["urn:mpeg:dash:profile:isoff-live:2011"]
        },
        {
          "locator": "http://192.168.178.55/m4d/provisioning-session-872a0eb2-e40a-41ed-bf2a-03b8343221a7/634cd01c-6822-4630-8444-8dd6279f94c6/CaminandesLlamaDrama4K.ism/manifest(format=m3u8-aapl-v3)",
          "contentType": "application/vnd.apple.mpegurl"
        }
      ]
    }
  ]
}
The Android application uses this endpoint later to derive the required information to populate the stream
selection dropdown and to query the Application Function via M5.
Optional: Creating a Server Certificate
Optionally, you can now
also create server certificate. For plain
http based playback, this step can be omitted.
The complete documentation on how to test the M5 interface for AF versions 1.2.0 and above can be found here
The ServiceAccessInformation will be needed on the client side later. This is requested via M5d by the
MediaSessionHandler. Since retrieving this information is done via a simple HTTP GET request, it can be accessed
directly in the browser. For that reason, call the following URL and replace {provisioningSessionId} with
the corresponding value. For instance,
http://${msaf.m5.addr}:${msaf.m5.port}/3gpp-m5/v2/service-access-information/${provisioningSessionId}
becomes
http://192.168.178.55:7778/3gpp-m5/v2/service-access-information/a0b5a258-d5da-41ed-b62f-cdd2806778b0
The output should look like the following:
{
  "provisioningSessionId": "a0b5a258-d5da-41ed-b62f-cdd2806778b0",
  "provisioningSessionType": "DOWNLINK",
  "streamingAccess": {
    "mediaPlayerEntry": "http://192.168.178.55/m4d/provisioning-session-a0b5a258-d5da-41ed-b62f-cdd2806778b0/BigBuckBunny_4s_onDemand_2014_05_09.mpd"
  }
}
Option 3: Server-side development setup
For development purposes, it can be useful to mock the functionality of the AF and the AS. For that reason, 5G-MAG
provides a simple static webserver. The server
basically contains two endpoints to query M8 information and the corresponding ServiceAccessInformation. The assets
that are linked on the webserver are pointing to third-party CDNs. However, it would also be possible to add media
content to the webserver in the public folder and thereby simulate a local Application Server.
1. Configure the webserver
Open /express-mock-af/routes/m8.js and adjust the m5BaseUrl to point to your machine.
Install the dependencies:
cd express-mock-af
npm install
2. Starting the webserver
Navigate to the root folder of the server and start it:
cd express-mock-af
npm start
Client-side setup
Now that the server-side setup is in place, focus shifts to the client side. Four components need to be installed (two libraries, two Android applications) for the end-to-end setup.
1. Installing the 5GMSd Common Android Library
The 5GMSd Common Android Library is an Android library that includes models and helper classes used within the different client-side Android applications such as the 5GMSd-Aware Application, 5GMSd Media Stream Handler and the 5GMSd Media Session Handler.
rt-5gms-common-android-libraryInstallation guide (Readme). Publish to a local maven repository as described there.2. Installing the 5GMSd Media Stream Handler
The 5GMSd Media Stream Handler is an Android library that includes the ExoPlayer as a dependency. The 5GMSd Media Stream Handler implements an adapter around the ExoPlayer APIs to expose TS.26.512 M7d interface functionality. Moreover, a MediaSessionHandlerAdapter establishes a Messenger connection to the Media Session Handler. The 5GMSd Media Stream Handler is included as an Android library by 5GMSd Aware Application.
rt-5gms-media-stream-handlerInstallation guide (Readme). Publish to a local maven repository as described there.3. Installing the 5GMSd Media Session Handler
The 5GMSd Media Session Handler is an Android application that implements functionality for 5G Media Streaming media session handling. It is implemented as an Android Messenger Service that communicates via Inter Process Communication (IPC) with other Android libraries and applications such as the Media Stream Handler and the 5GMSd Aware Application.
The Media Session Handler communicates with the 5GMSd Application Function via interface M5 to establish and control the delivery of a streaming media session in the downlink direction. In addition, the Media Session Handler exposes APIs via M6 to the 5GMSd-Aware Application and to the Media Player (for downlink streaming).
rt-5gms-media-session-handlerInstallation guide (Readme).4. Configuring and installing the 5GMSd-Aware Application
The 5GMSd-Aware Application is an Android application that serves as a reference implementation for 5GMSd. It uses the Media Stream Handler for playback and communication with the Media Session Handler.
The 5GMSd Aware Application is an application in the UE, provided by the 5GMSd Application Provider, that contains the service logic of the 5GMSd application service, and interacts with other 5GMSd Client and Network functions via the interfaces and APIs defined in the 5GMSd architecture.
4.a Common Configuration
The 5GMSd-Aware Application supports m8 input via REST endpoints or local files. For that reason, a configuration file
located in app/src/main/assets/app_config.json is used. It contains a list of the possible m8 endpoints and their
corresponding metadata endpoints. Per
default, a single 5G-MAG hosted endpoint is linked:
{
  "sources": [
    {
      "name": "5G-MAG online reference",
      "m8Url": "https://rt.5g-mag.com/m8.json",
      "metadataUrl": "https://rt.5g-mag.com/metadata.json"
    }
  ]
}
For a local AS and AF setup, this list only needs to be extended with the M8 endpoint created previously. If
using the Docker based setup, a static webserver is also provided that hosts the metadata.json and the corresponding
poster images. An example of the configuration file after adding the Docker endpoint looks like this:
{
  "sources": [
    {
      "name": "5G-MAG online reference",
      "m8Url": "https://rt.5g-mag.com/m8.json",
      "metadataUrl": "https://rt.5g-mag.com/metadata.json"
    },
    {
      "name": "Docker",
      "m8Url": "http://<YOUR_MACHINE_IP_HERE>:8000/m8.json",
      "metadataUrl": "http://<YOUR_MACHINE_IP_HERE>:3344/metadata.json"
    }
  ]
}
Replace <YOUR_MACHINE_IP_HERE> with the IP of the machine for instance:
{
  "sources": [
    {
      "name": "5G-MAG online reference",
      "m8Url": "https://rt.5g-mag.com/m8.json",
      "metadataUrl": "https://rt.5g-mag.com/metadata.json"
    },
    {
      "name": "Docker",
      "m8Url": "http://192.168.178.56:8000/m8.json",
      "metadataUrl": "http://192.168.178.56:3344/metadata.json"
    }
  ]
}
4.a Alternative: Development Configuration
As an alternative, you can also use the M8 endpoint of the development web server. For that reason, uncomment the
following line and replace the IP address with the IP address of your machine.
{
  "sources": [
    {
      "name": "Development setup",
      "m8Url": "http://192.168.178.56:3003/m8.json",
      "metadataUrl": "http://192.168.178.56:3003/metadata.json"
    }
  ]
}
4.b Installation
rt-5gms-applicationInstallation guide (Readme) for the 5GMSd-Aware Application.5. Running the application
Now that all the required setup and configuration is complete, start the client-side applications.
Unlock your Android phone and start the MediaSessionHandler if it is not already running. Afterwards start the
5GMSd-Aware Application. Select an M8 entry from the dropdown and then select one of the available stream URLs.
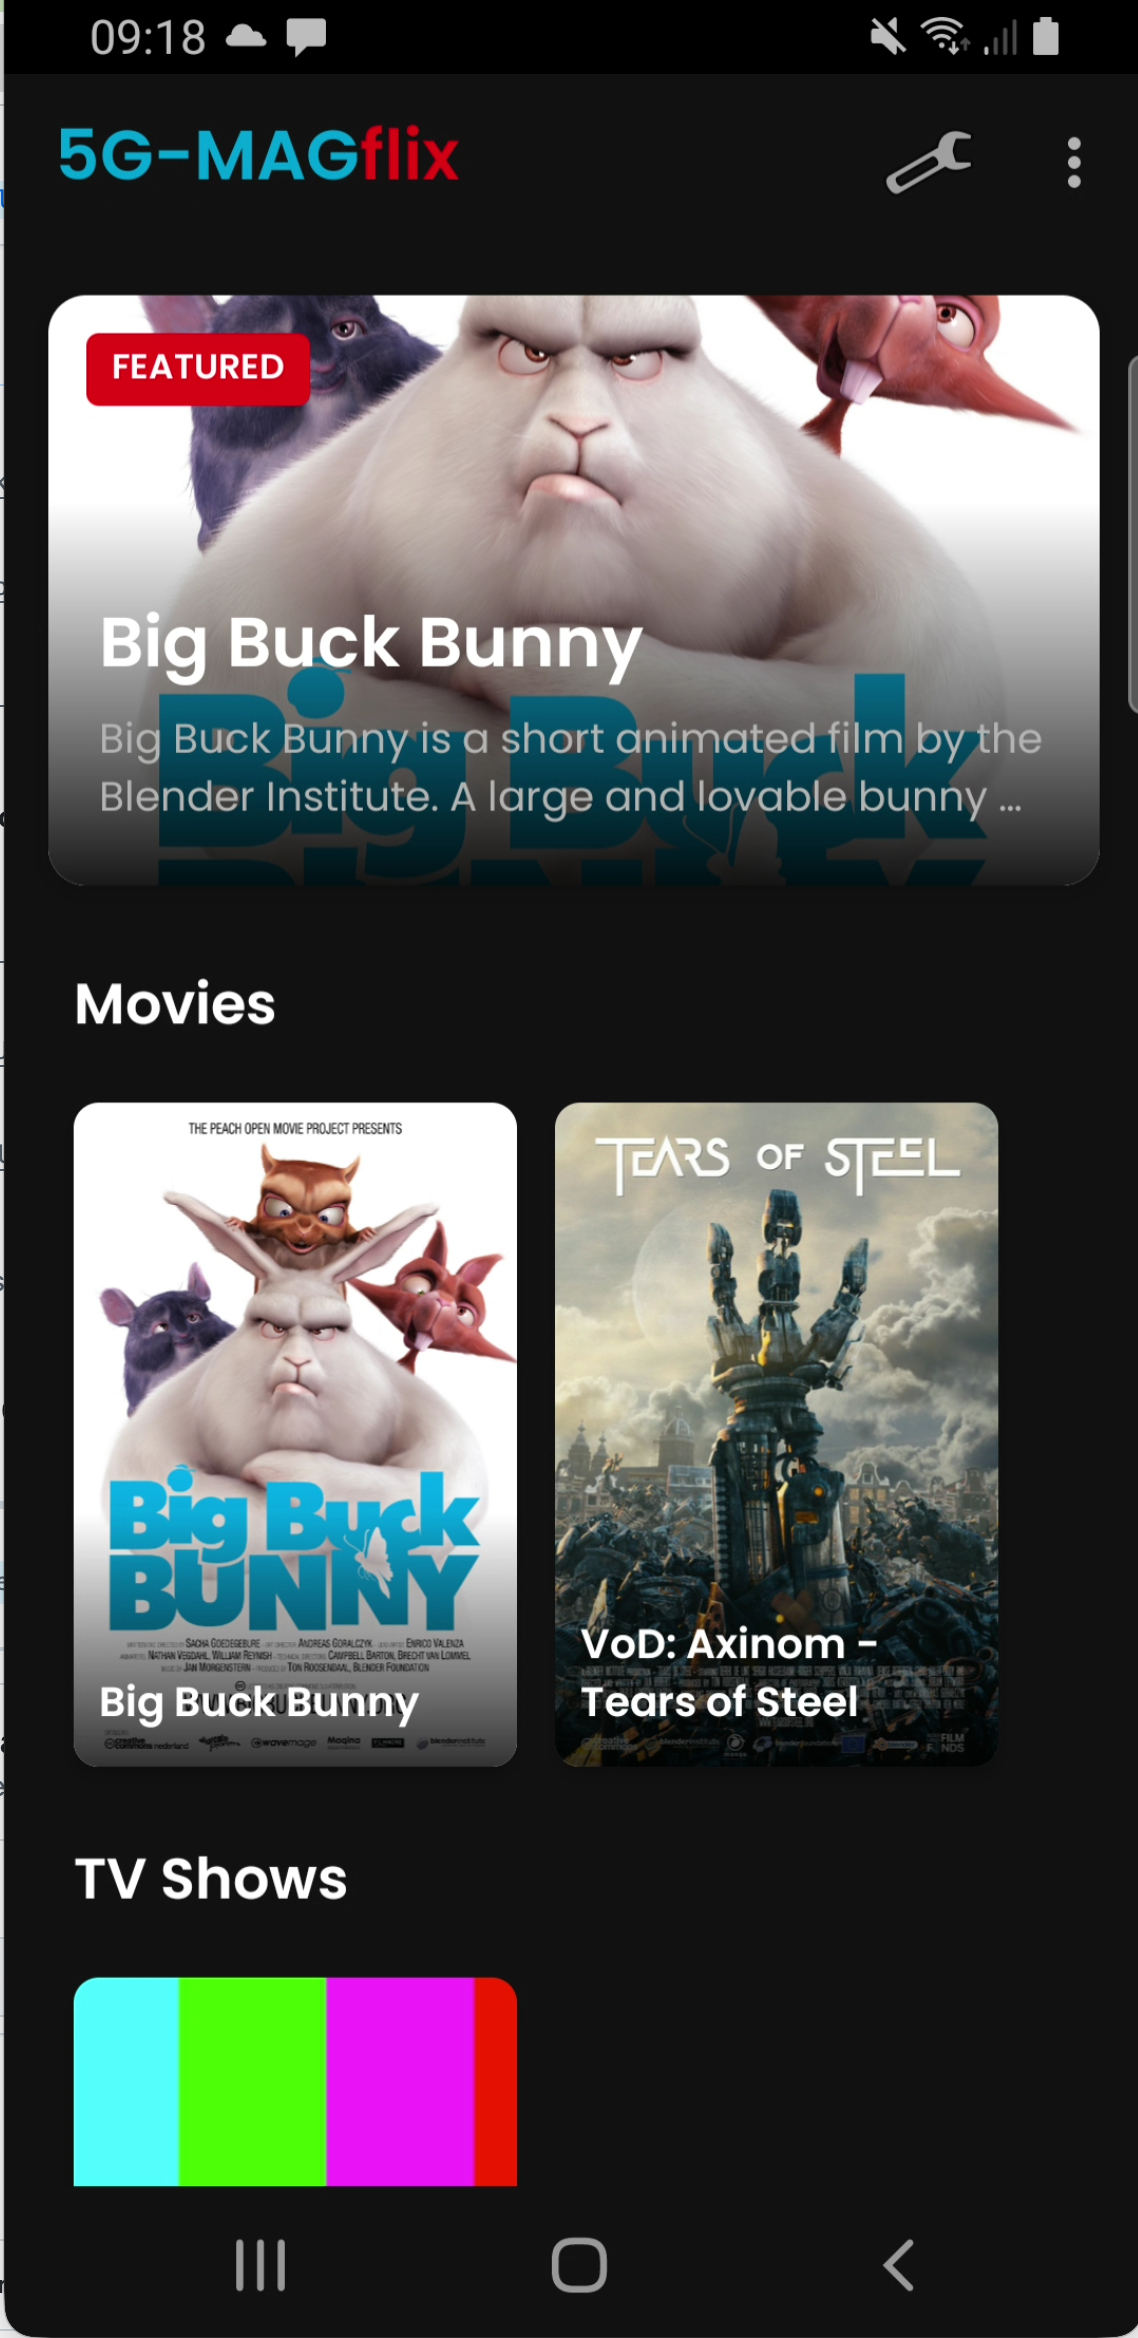
Next, click on Start Playback. The output should look like this:
Next steps
Now that you have a working end-to-end deployment, you can add reporting features on top of it:
- 5G Media Streaming with Consumption Reporting
- 5G Media Streaming with QoE Metrics Reporting
- CMCD Reporting
- 5G MSd End-to-End deployment with 5G Network
- To exercise individual interfaces in detail: Testing the 5GMS Application Function and Developing and Testing the 5GMS Application Server.
- Return to the Tutorials index.