This tutorial allows to: Use Consumption Reporting for 5G Media Streaming.
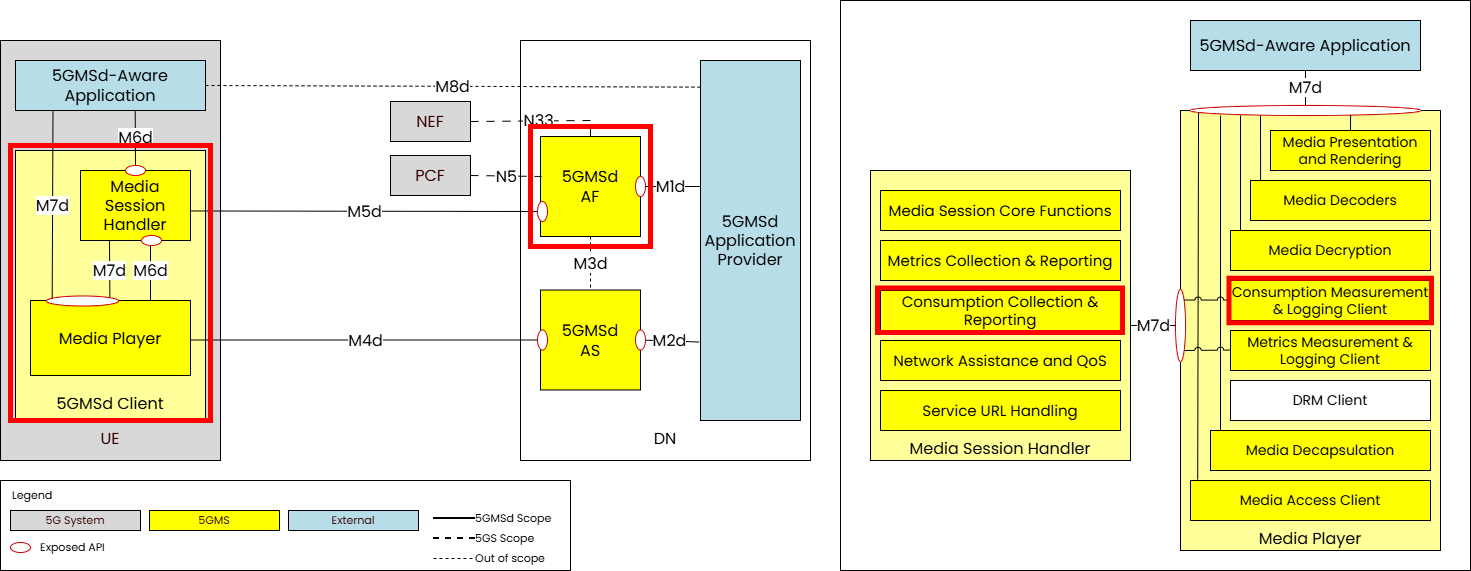
What you will build: a 5GMSd session that collects consumption reports from the Media Player and sends them to the 5GMSd Application Function (AF), where you can then read the resulting reports.
Consumption Collection and Reporting collects content consumption measurement logs from the Media Player. It sends consumption reports to a 5GMSd AF describing the currently consumed media within the available presentation, the User Equipment (UE) capabilities, and the environment of the media session. The network can use this for transport optimisations or for consumption report analysis.
The workflow is: first configure the 5GMS Application Function and the 5GMS Application Server; next, start a 5GMS media streaming downlink session on the client side; finally, access the resulting consumption reports from the local hard drive.
Prerequisites
This tutorial assumes you have already completed the server-side and client-side setup in the basic end-to-end guide. Steps 1 to 6 below simply point back to that guide; if you have a working end-to-end deployment you can skip straight to Step 7 (adding a Consumption Reporting configuration).
Server-side setup
Step 1: Install the Application Function
For details please refer to the corresponding section in the basic end-to-end guide.
Step 2: Install the Application Server
For details please refer to the corresponding section in the basic end-to-end guide.
Step 3: Start the Application Server
For details please refer to the corresponding section in the basic end-to-end guide.
Step 4: Basic Configuration of the Application Function
Follow the basic configuration steps documented in the basic end-to-end guide.
Step 5: Start the Application Function
Follow the command documented in the basic end-to-end guide.
Step 6: Create a Content Hosting Configuration and Provisioning Session
Follow the steps to create a content hosting configuration
and a provisioning session using the msaf-configuration tool.
Step 7: Adding a Consumption Reporting Configuration
Now that a provisioning session has been created, a Consumption configuration can be added to that provisioning session. This guide uses the Postman Collection for this. However, the same configuration is possible using any other REST client or the Management UI.
Step 7.1 Install and Import the Postman Collection
Postman CollectionInstall and import the collection (Readme), part of rt-5gms-application-provider.Step 7.2 Retrieving the Provisioning Session ID
Open a browser and navigate to http://<YOUR_MACHINE_IP_HERE>/m8.json. Replace <YOUR_MACHINE_IP_HERE> with the IP of the
machine that the 5GMS Application Function is running on. Then copy the provisioningSessionId from the JSON to your
clipboard. As an example, the m8.json can look like this with a provisioningSessionId set
to 1fd61716-fe25-41ee-8d9e-cb36a16378a2.
{
  "m5BaseUrl": "http://192.168.2.7:7778/3gpp-m5/v2/",
  "serviceList": [
    {
      "provisioningSessionId": "1fd61716-fe25-41ee-8d9e-cb36a16378a2",
      "name": "VoD: Elephant's Dream",
      "entryPoints": [
        {
          "locator": "http://192.168.2.7/m4d/provisioning-session-1fd61716-fe25-41ee-8d9e-cb36a16378a2/elephants_dream/1/client_manifest-all.mpd",
          "contentType": "application/dash+xml",
          "profiles": ["urn:mpeg:dash:profile:isoff-live:2011"]
        }
      ]
    },
    {
      "provisioningSessionId": "1fd61716-fe25-41ee-8d9e-cb36a16378a2",
      "name": "VoD: Big Buck Bunny",
      "entryPoints": [
        {
          "locator": "http://192.168.2.7/m4d/provisioning-session-1fd61716-fe25-41ee-8d9e-cb36a16378a2/bbb/2/client_manifest-common_init.mpd",
          "contentType": "application/dash+xml",
          "profiles": ["urn:mpeg:dash:profile:isoff-live:2011"]
        }
      ]
    },
    {
      "provisioningSessionId": "1fd61716-fe25-41ee-8d9e-cb36a16378a2",
      "name": "VoD: Testcard",
      "entryPoints": [
        {
          "locator": "http://192.168.2.7/m4d/provisioning-session-1fd61716-fe25-41ee-8d9e-cb36a16378a2/testcard/vod/manifests/avc-full.mpd",
          "contentType": "application/dash+xml",
          "profiles": ["urn:mpeg:dash:profile:isoff-live:2011"]
        },
        {
          "locator": "http://192.168.2.7/m4d/provisioning-session-1fd61716-fe25-41ee-8d9e-cb36a16378a2/testcard/vod/manifests/avc-full.m3u8",
          "contentType": "application/x-mpegURL"
        }
      ]
    }
  ]
}
Step 7.3 Postman - Environment Configuration
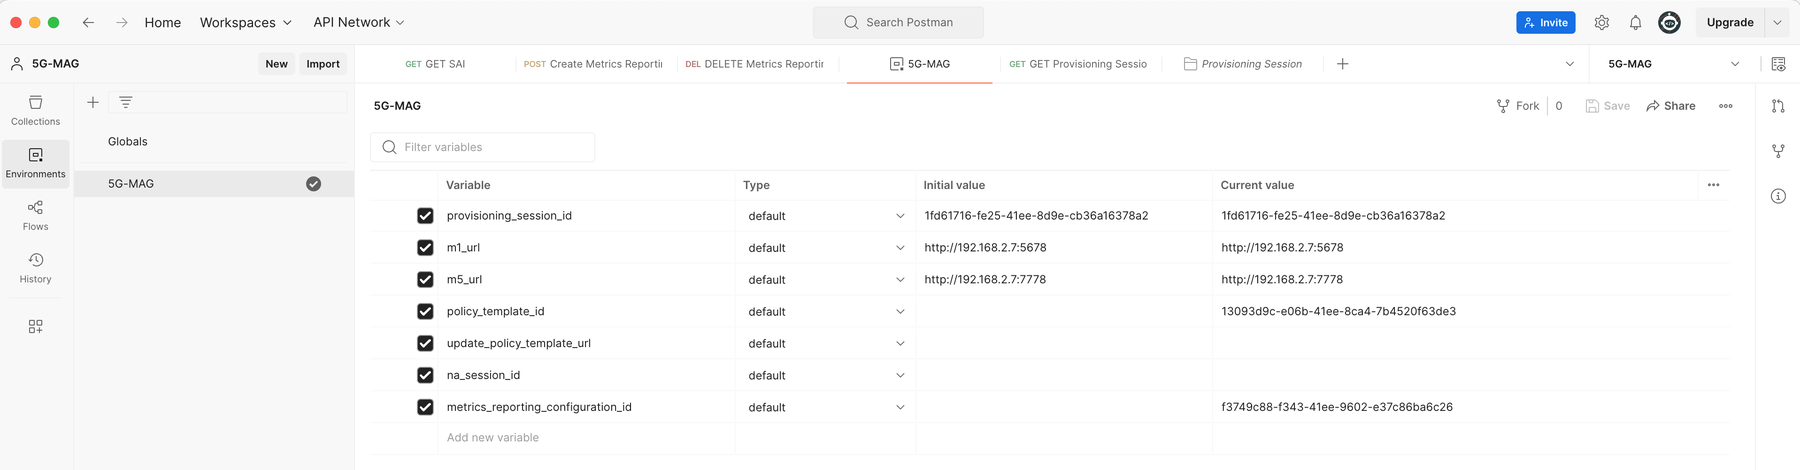
Start Postman and navigate to the Postman Environments located on the left side. Replace the provisioning_session_id
variable with the value from the JSON file:
Step 7.4 Postman - Create Consumption Reporting Configuration
In Postman navigate to Collections and select 5G-MAG M1. Navigate to Consumption Reporting and
select Create Consumption Reporting Configuration. Then adjust the attributes in the payload section based on the
desired
configuration. An example configuration looks the following:
{
  "reportingInterval": 10,
  "samplePercentage": 100,
  "locationReporting": true,
  "accessReporting": true
}
Click on Send once the configuration is set:
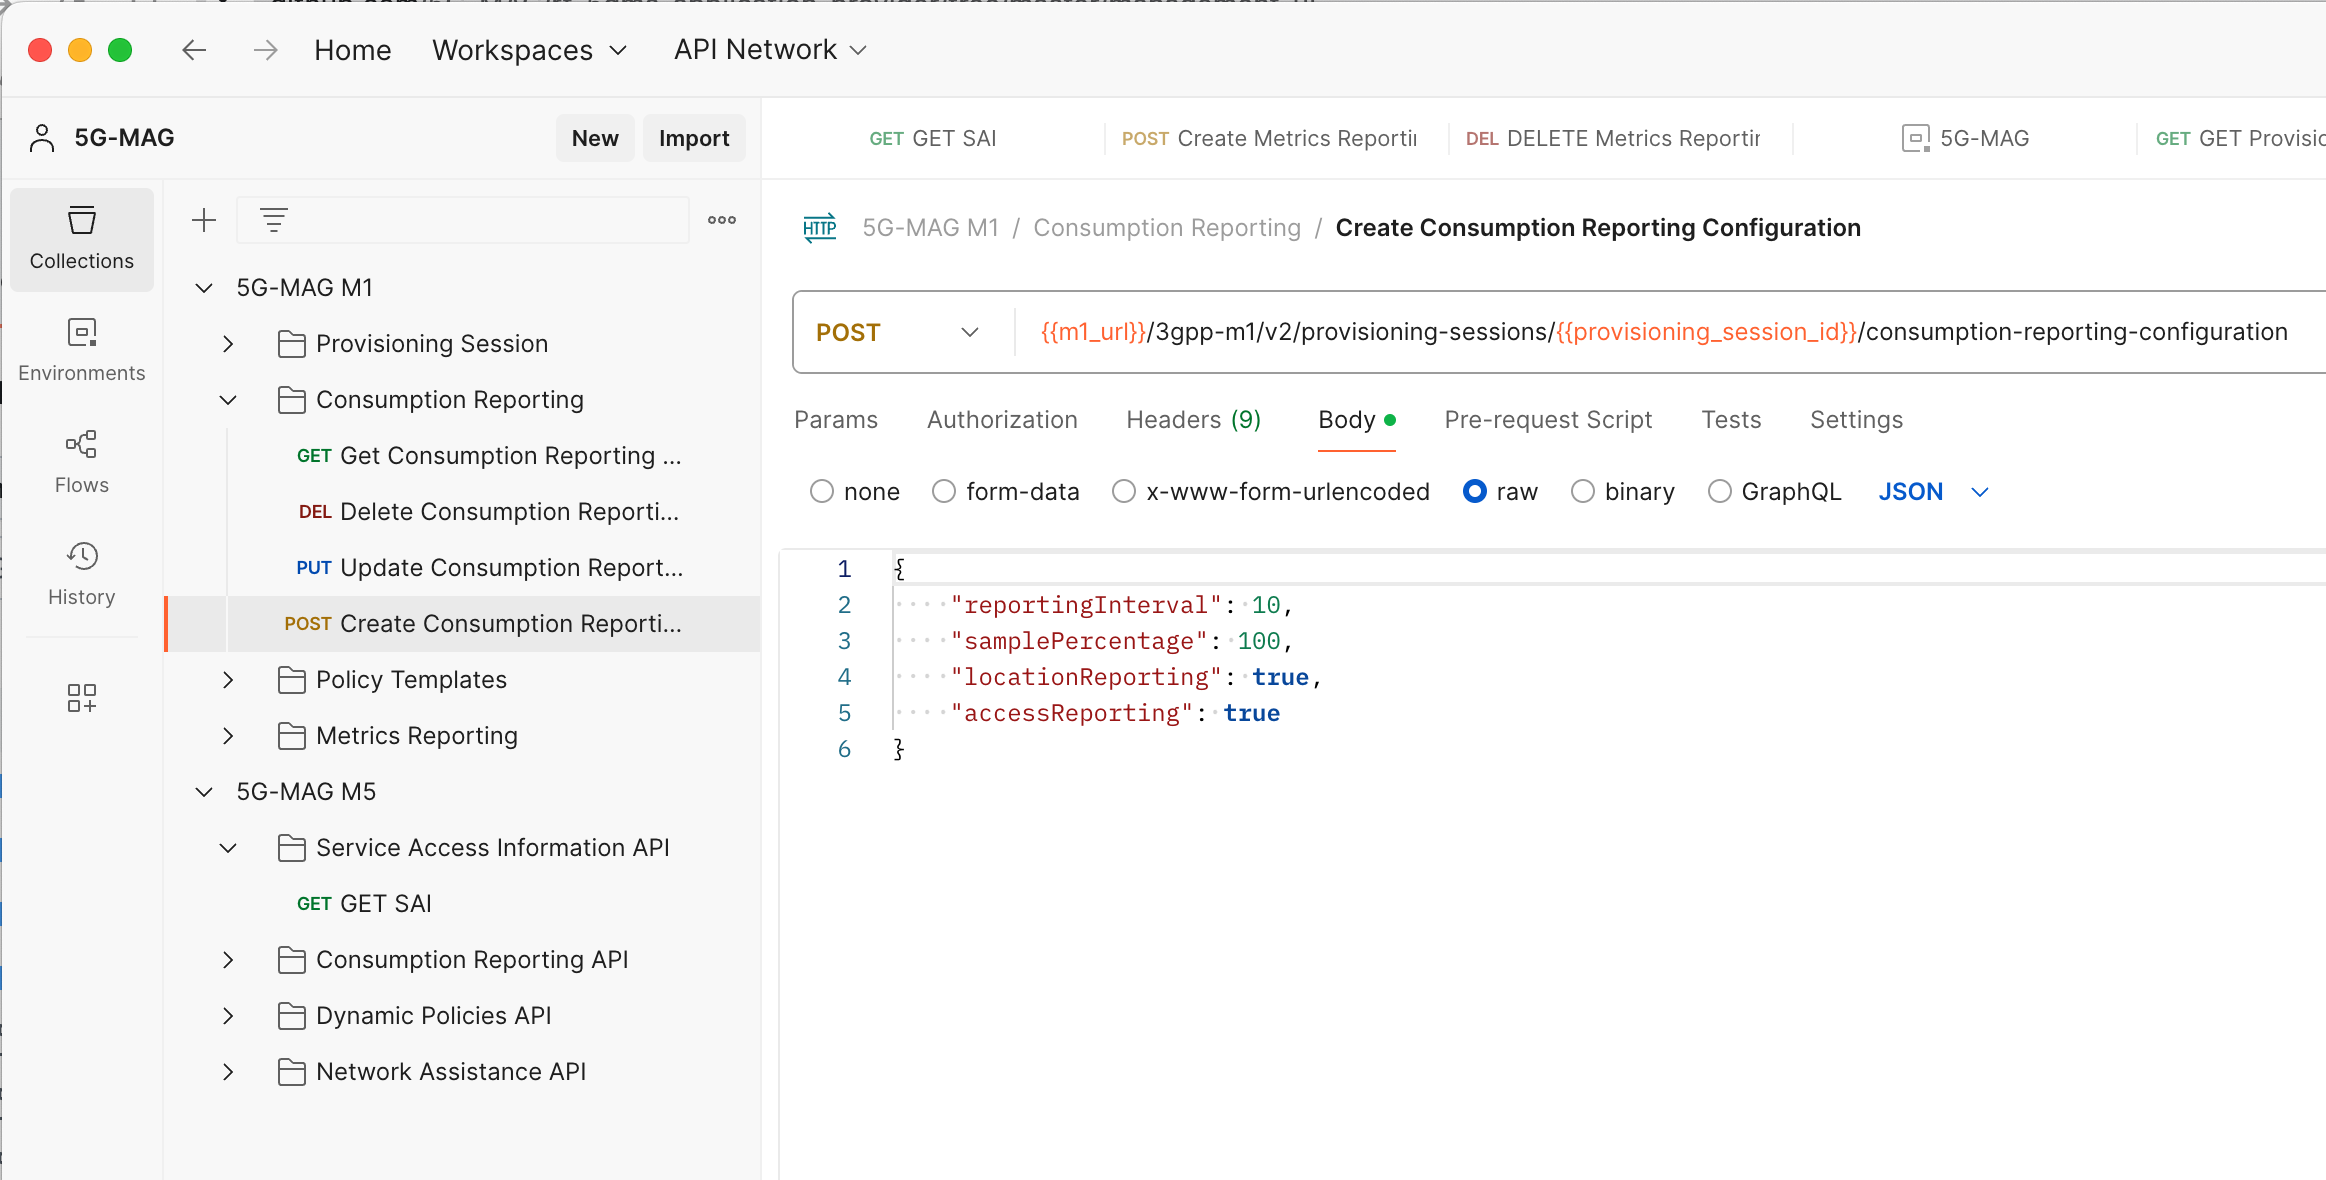
The REST call should return a 201 response code indicating that the call was accepted by the Application Function.
Step 7.5 Postman - Validate the Service Access Information
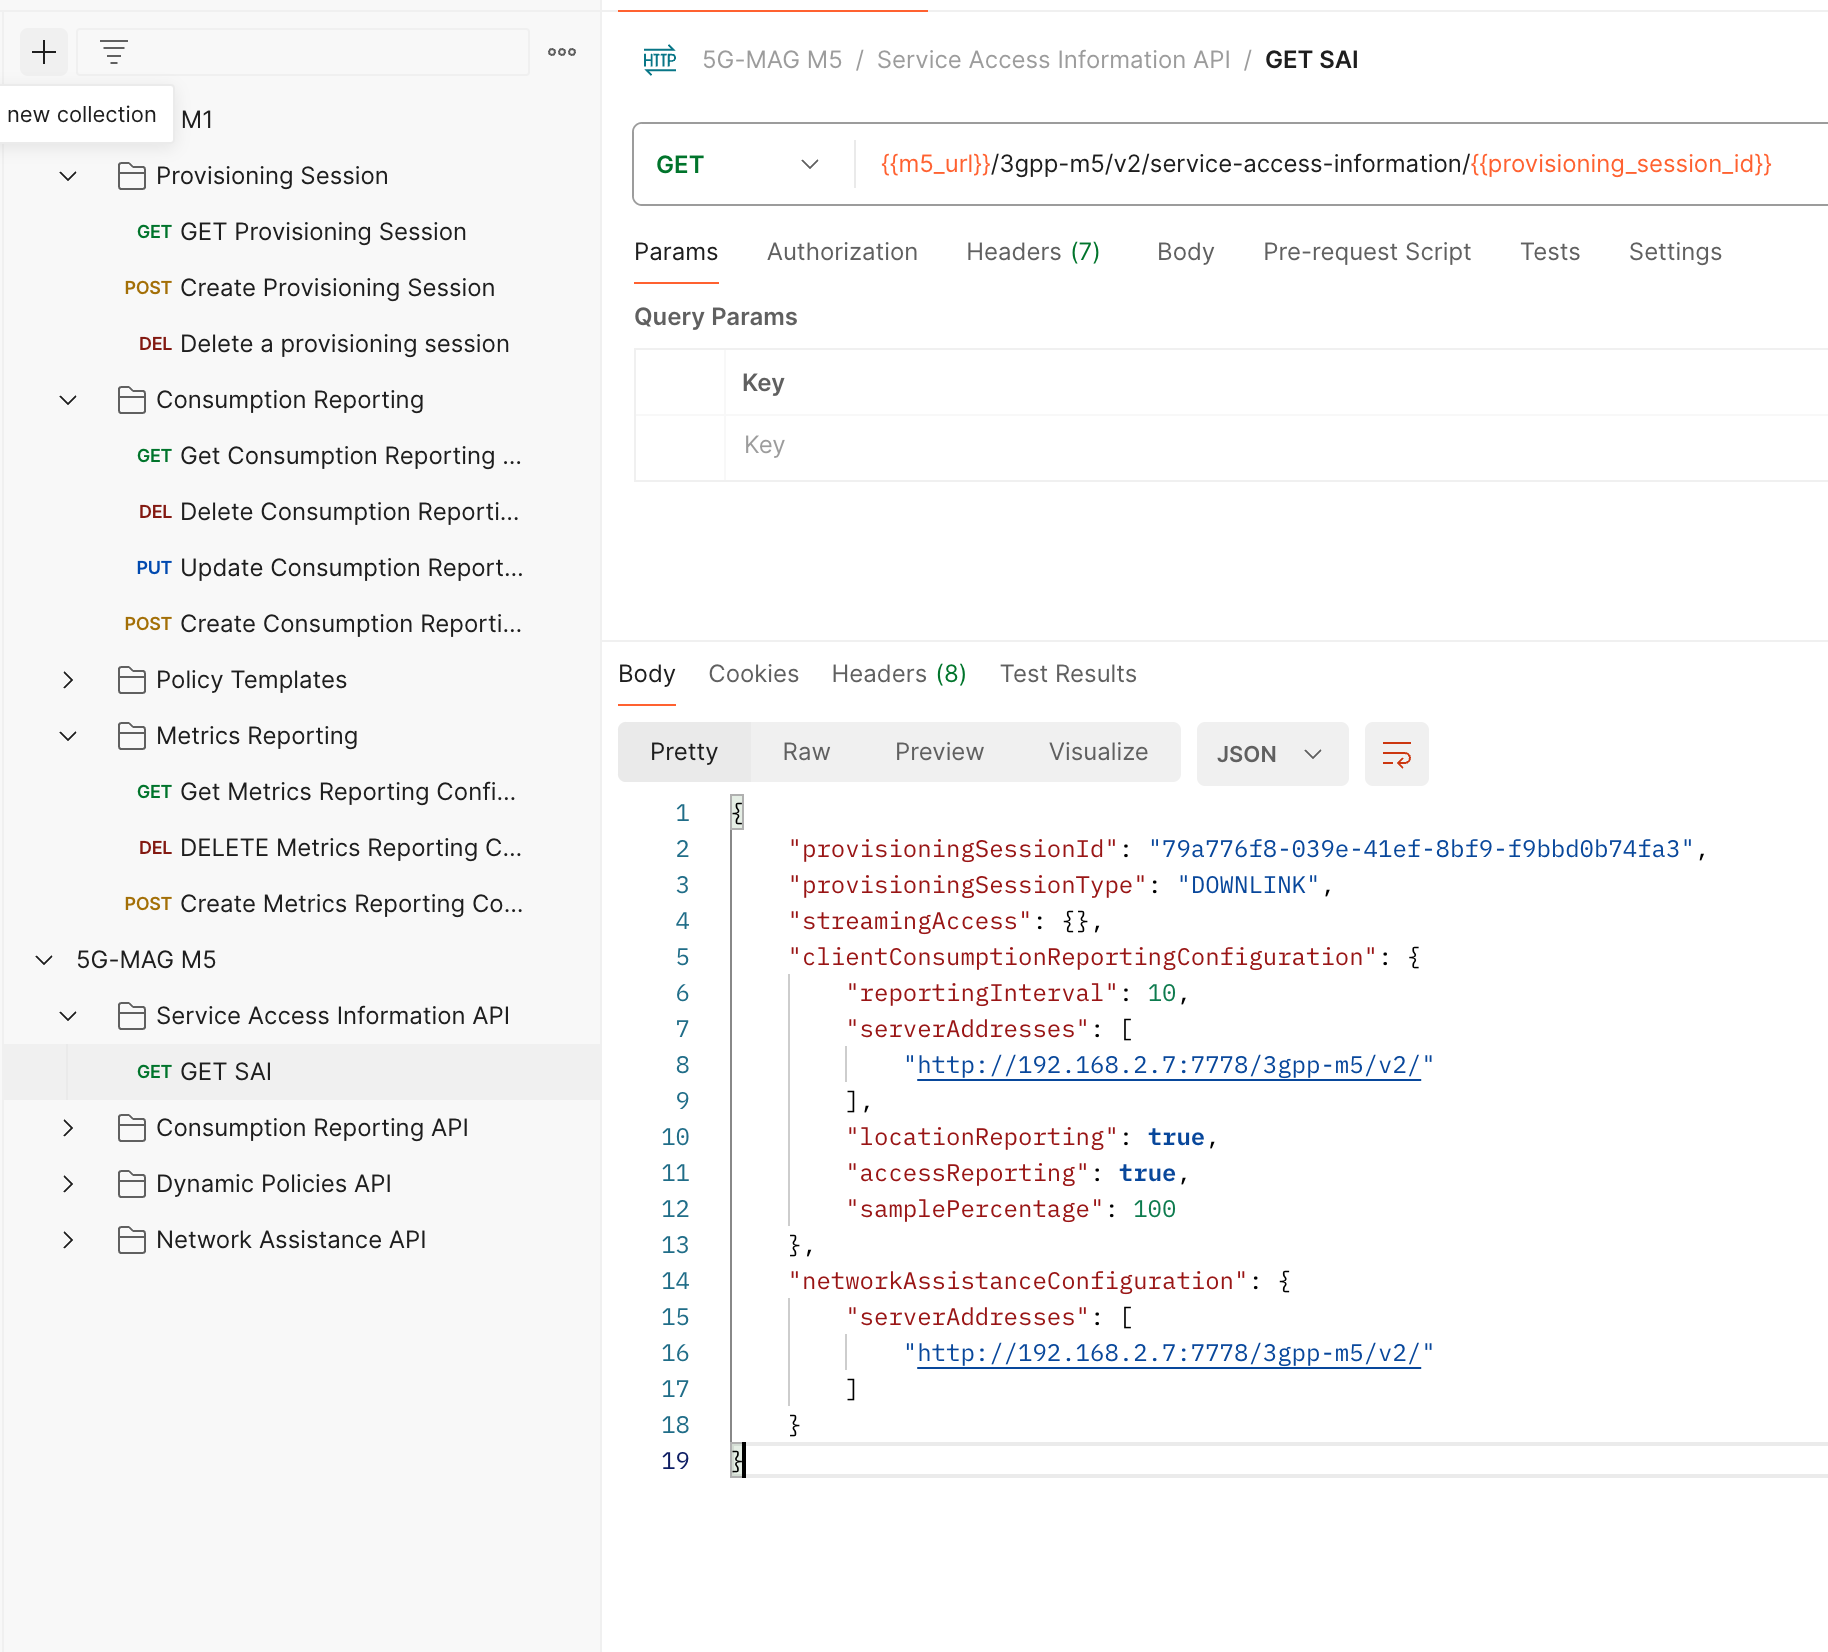
Now that a Consumption Reporting configuration has been provided via the M1 interface, the Service Access Information
should contain the relevant information for the 5GMSd Client. This can be validated via the M5 interface.
Select Collections in Postman and navigate to 5G-MAG M5. Select Service Access Information API and then GET SAI.
Click Send and confirm that the Service Access Information contains a clientConsumptionReportingConfigurations:
Client-side setup
With the server-side set up, focus shifts to the client side.
Step 1: Installation, Configuration and Running the 5GMSd Client
Please follow the instructions documented in the basic end-to-end guide setup guide.
Step 2: Creating Consumption Report
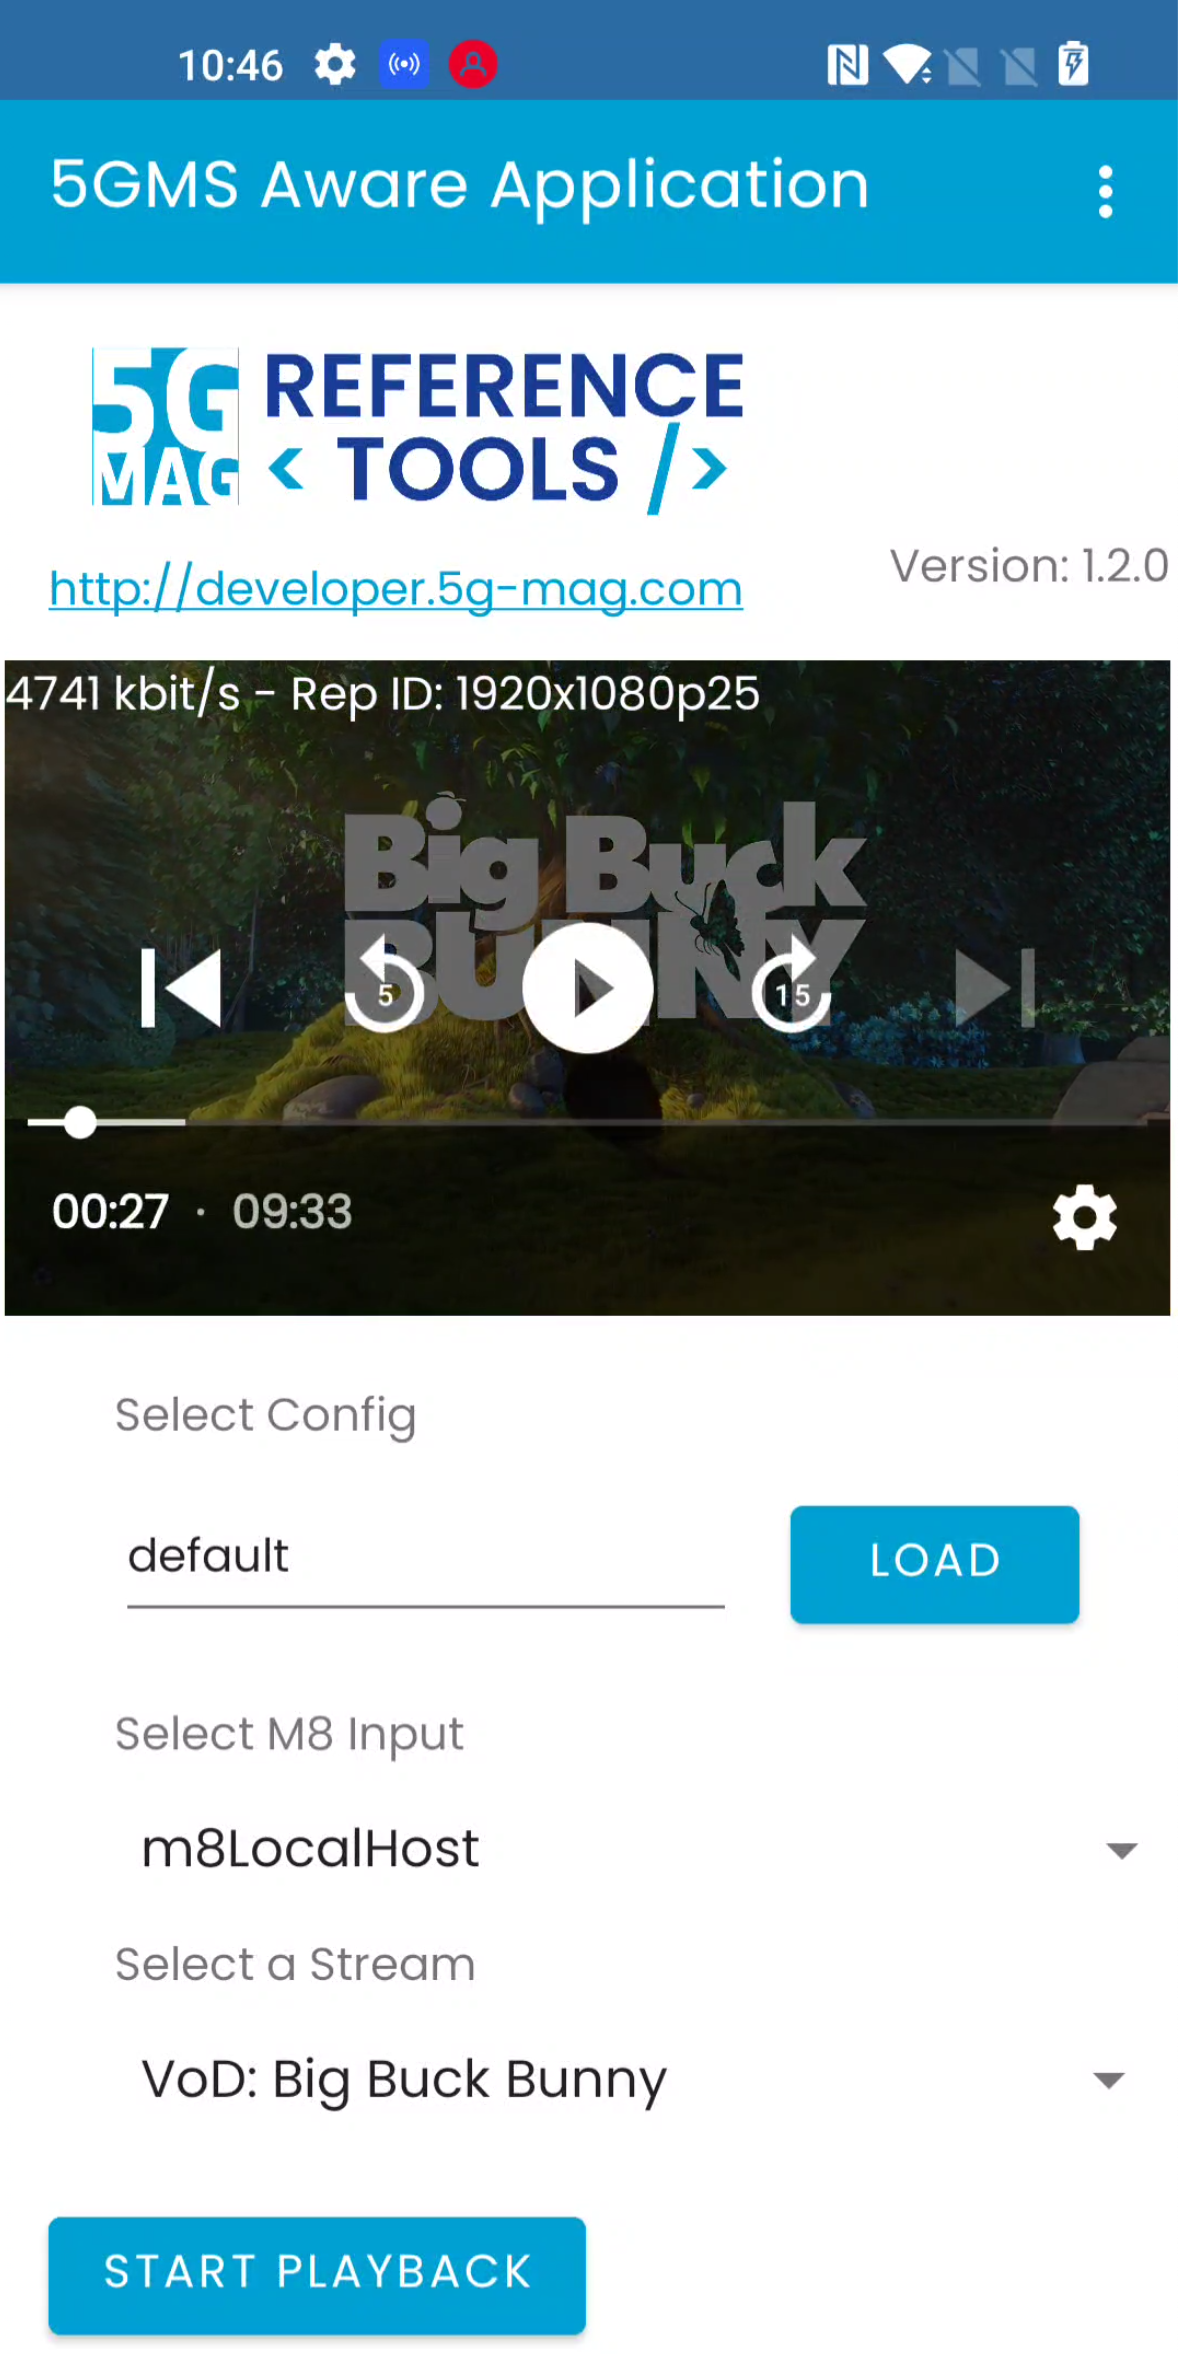
While consuming content configured and provided via the previously installed 5GMSd Application Server and 5GMSd Application Function, the client automatically creates and sends Consumption Reports.
Step 3: Inspecting the Consumption Report
By default the Consumption Reports provided via the M5 interface from the Media Session Handler to the 5GMS
Application Function are saved to disk. They can be accessed and opened in a text editor. On the machine that
is running the Application Function:
- Navigate to
/var/local/log/open5gs/reports/ - For each provisioning session id a dedicated folder is created. Open the right folder by using the right provisioning
session identifier. In this example the folder is named
79a776f8-039e-41ef-8bf9-f9bbd0b74fa3. Open the folder:cd 79a776f8-039e-41ef-8bf9-f9bbd0b74fa3. - Open the consumption reports folder:
cd consumption_reports - Type
lsto get an overview of the different reports. - Open the reports and check the data. It should look similar to the example below. Each entry in
consumptionReportingUnitsrecords one piece of media consumed, with the client and server endpoints and astartTime. Note thatdurationandlocationsmay be empty (0 and[]) for short sessions or when location reporting has no data to report yet.
{
  "mediaPlayerEntry": "http://192.168.2.7/m4d/provisioning-session-79a776f8-039e-41ef-8bf9-f9bbd0b74fa3/elephants_dream/1/client_manifest-all.mpd",
  "reportingClientId": "730cf565-59d3-4ab0-ab01-94b44cd2ff45",
  "consumptionReportingUnits": [
    {
      "mediaConsumed": "704x396p25",
      "clientEndpointAddress": {
        "ipv4Addr": "192.168.2.8",
        "portNumber": 443
      },
      "serverEndpointAddress": {
        "domainName": "vod-dash-ww-rd-live.akamaized.net",
        "portNumber": 443
      },
      "startTime": "2024-04-26T10:11:30Z",
      "duration": 0,
      "locations": []
    },
    {
      "mediaConsumed": "128kbps",
      "clientEndpointAddress": {
        "ipv4Addr": "192.168.2.8",
        "portNumber": 443
      },
      "serverEndpointAddress": {
        "domainName": "vod-dash-ww-rd-live.akamaized.net",
        "portNumber": 443
      },
      "startTime": "2024-04-26T10:11:30Z",
      "duration": 0,
      "locations": []
    }
  ]
}
Next steps
- Try the related reporting tutorials: QoE Metrics Reporting and CMCD Reporting.
- Return to the Tutorials index.